Introduction
There’s something truly irresistible about the aroma of freshly baked bread wafting through your home, and when that bread comes in the form of soft and chewy pull-apart pretzel rolls, the allure is even stronger. These delightful rolls have captured the hearts and taste buds of many, thanks to their unique texture and rich flavor. Imagine sinking your teeth into a warm roll with a slightly crisp exterior that gives way to a soft, fluffy interior—it’s a baking experience that is hard to replicate with store-bought options.
Homemade pretzel rolls elevate any meal, from casual family dinners to elegant gatherings. Their slightly salty, buttery flavor pairs perfectly with a variety of dishes, making them a versatile addition to your culinary repertoire. Plus, the convenience of enjoying them fresh out of the oven adds an extra layer of satisfaction. Whether you serve them alongside soups, stews, or even as sliders, these pretzel rolls are sure to impress your guests and keep them coming back for more.
Understanding Pretzel Rolls
Originating from the German-speaking regions of Europe, pretzel rolls are a delightful twist on the classic pretzel. Traditionally, pretzels have a distinctive twisted shape, but when transformed into rolls, they take on a more approachable form, making them perfect for sharing and enjoying in a variety of settings. The process of creating pretzel rolls involves a few key techniques that contribute to their signature texture and flavor, including the unique method of boiling the dough in a baking soda bath before baking.
Pretzel rolls hold a special place in various cuisines around the world. In Germany, they are often served as accompaniments to hearty meals, while in the United States, they have become a popular choice at barbecues and gatherings. The rise in popularity of gourmet sliders has also led to a surge in the use of pretzel rolls in restaurant menus, where they are often featured as a fun and flavorful alternative to traditional burger buns.
The versatility of pretzel rolls extends beyond just being a side dish. They can be enjoyed with various spreads, such as mustard or cheese, making them a perfect party snack. Additionally, they can be served as a base for sandwiches, filled with everything from savory meats to roasted vegetables. Their chewy texture and rich flavor make them suitable for a range of occasions, from casual brunches to festive holiday dinners.
Key Ingredients for Soft & Chewy Pretzel Rolls
To create the perfect soft and chewy pretzel rolls at home, you’ll need to gather a few essential ingredients, each playing a crucial role in achieving that signature pretzel taste and texture. Here’s a breakdown of the key ingredients you’ll need for this recipe:
1. Active Dry Yeast
Active dry yeast is the star of the show when it comes to leavening your pretzel rolls. This ingredient is responsible for making the dough rise, creating a light and airy texture. When activated properly, yeast consumes sugar and produces carbon dioxide, which causes the dough to expand. It’s essential to ensure your yeast is fresh and properly activated with warm water to achieve the best results.
2. Warm Water
Warm water is crucial for activating the yeast. The ideal temperature for activating yeast is between 100°F to 110°F (37°C to 43°C). If the water is too hot, it can kill the yeast, while water that is too cold may not activate it effectively. When combined with sugar and yeast, warm water helps create a frothy mixture that indicates the yeast is alive and ready to work its magic.
3. Sugar
Sugar is more than just a sweetener in this recipe; it plays an important role in flavor development and yeast fermentation. The sugar feeds the yeast, enhancing its activity and contributing to the overall flavor profile of the pretzel rolls. It also helps to create a slight browning effect on the crust during baking, adding to the visual appeal of the rolls.
4. Flour
Flour is the backbone of the pretzel roll dough, providing structure and chewiness. All-purpose flour works best for this recipe, as it contains the right balance of protein to create a dough that is both pliable and sturdy. The gluten formed from the flour gives the pretzel rolls their characteristic chewy texture while allowing them to rise properly.
5. Salt
Salt is essential for balancing flavors in baked goods, and pretzel rolls are no exception. It enhances the overall taste and acts as a strengthener for the gluten in the dough, contributing to the rolls’ chewy texture. Be sure to use a fine sea salt or kosher salt for even distribution throughout the dough.
6. Baking Soda
One of the defining characteristics of pretzel rolls is their unique crust, and baking soda is the key to achieving that signature pretzel flavor. Before baking, the rolls are briefly boiled in a solution of water and baking soda. This step creates the classic pretzel crust by altering the pH of the dough, resulting in a deep brown color and distinctive flavor when baked.
7. Egg Wash
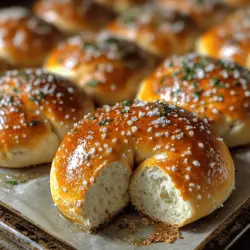
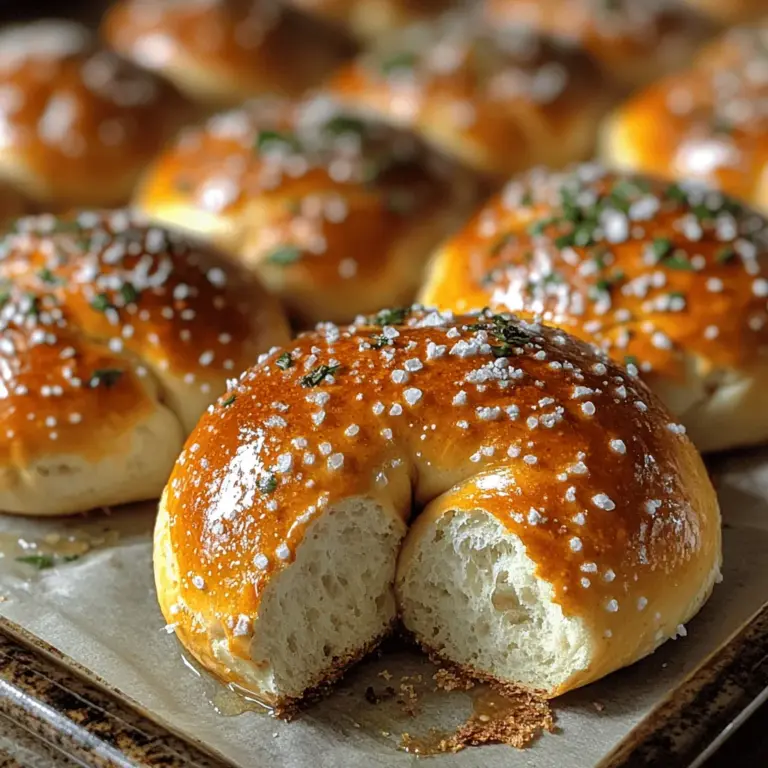
An egg wash is used to give your pretzel rolls a beautiful golden color and a glossy finish. It consists of a beaten egg mixed with a little water or milk, which is brushed onto the rolls before baking. This final touch adds an appealing sheen to the rolls and helps the coarse sea salt adhere to the surface.
8. Coarse Sea Salt
Coarse sea salt is the finishing touch for your pretzel rolls, adding a delightful crunch and burst of flavor. It enhances the overall taste and gives a nod to the traditional pretzel experience. Be generous but mindful when sprinkling the salt on top, as it can easily overpower the rolls if used excessively.
Step-by-Step Guide to Making Soft & Chewy Pretzel Rolls
Now that we’ve covered the essential ingredients, it’s time to dive into the step-by-step process of making your own soft and chewy pretzel rolls. This recipe may seem a bit involved, but with careful attention to each step, you’ll be rewarded with rolls that are sure to impress.
Step 1: Activating the Yeast
Begin by activating the yeast. In a small bowl, combine 1¼ cups of warm water (between 100°F to 110°F), 1 tablespoon of sugar, and 2½ teaspoons of active dry yeast. Gently stir the mixture and let it sit for about 5 to 10 minutes until it becomes frothy. This frothiness indicates that the yeast is alive and ready to work.
Step 2: Mixing the Dough
In a large mixing bowl, combine 4 cups of all-purpose flour and 1 tablespoon of salt. Make a well in the center of the dry ingredients and pour in the activated yeast mixture. Using a wooden spoon or your hands, mix until the dough begins to come together. If the dough is too sticky, add a little extra flour, one tablespoon at a time, until it reaches a workable consistency.
Step 3: Kneading the Dough
Once the dough has formed, transfer it to a lightly floured surface and knead it for about 5 to 7 minutes. Kneading helps develop gluten, which is crucial for the chewy texture of the rolls. The dough should become smooth and elastic. If it feels too tacky, sprinkle a little more flour as needed.
Step 4: First Rise
Shape the kneaded dough into a ball and place it in a greased bowl, turning it to coat the surface lightly with oil. Cover the bowl with a clean kitchen towel or plastic wrap and let it rise in a warm, draft-free area for about 1 hour or until doubled in size. This rise allows the dough to develop flavor and texture.
Step 5: Shaping the Rolls
Once the dough has risen, punch it down to release any air bubbles. Transfer it back to your floured surface and divide it into 12 equal pieces. Shape each piece into a smooth ball by tucking the edges underneath to create a round shape. Place the rolls on a parchment-lined baking sheet, leaving space between each for expansion.
Step 6: Second Rise
Cover the shaped rolls with a kitchen towel and let them rise again for about 30 minutes, or until they puff up slightly. This second rise is essential for achieving the desired texture and ensures that your rolls will be soft and fluffy.
Step 7: Preparing the Baking Soda Bath
While the rolls are rising, prepare the baking soda bath. In a large pot, bring 10 cups of water to a boil and add ⅔ cup of baking soda. Be cautious, as the mixture will bubble vigorously. Once the water is boiling, reduce the heat to medium-high.
Step 8: Boiling the Rolls
Preheat your oven to 425°F (220°C). Once the baking soda bath is ready, carefully drop the risen rolls into the boiling water, working in batches if necessary. Boil each roll for about 30 seconds on each side. This step is crucial for developing the pretzel crust and should be done gently to avoid deflating the rolls.
Step 9: Egg Wash and Topping
After boiling, use a slotted spoon to transfer the rolls back to the parchment-lined baking sheet. Allow any excess water to drain off. In a small bowl, whisk together one egg and a tablespoon of water to create the egg wash. Brush the tops of the rolls generously with the egg wash, then sprinkle coarse sea salt over the top.
With these steps, you’re well on your way to creating a batch of delicious soft and chewy pull-apart pretzel rolls. Stay tuned as we delve into the baking process and share tips to ensure your rolls turn out perfectly every time. Enjoy the delightful journey of making these homemade treats!

Making the Dough
Creating the perfect dough is foundational to achieving soft and chewy pull-apart pretzel rolls. Begin by combining the warm water, sugar, and yeast in a mixing bowl. Allow the yeast to activate for about 5-10 minutes until it becomes frothy, indicating that the yeast is alive and ready to work its magic.
Once your yeast mixture is ready, gradually add in the flour and salt. It is essential to use bread flour for this recipe, as its higher protein content promotes gluten development, which is crucial for the chewy texture of the rolls. Mix the ingredients until they form a shaggy dough. At this stage, you can use a stand mixer fitted with a dough hook or mix by hand, ensuring the flour is fully incorporated but not over-mixed. The dough should be slightly sticky but manageable; if it’s too dry, add a teaspoon of water at a time until you reach the right consistency.
Kneading
Kneading is an essential step that contributes to the elasticity of the dough. Transfer the dough onto a lightly floured surface and knead for about 8-10 minutes until it becomes smooth and elastic. To knead, fold the dough over itself and push it down with the heel of your hand, then turn it a quarter turn and repeat. This process helps develop the gluten, leading to the chewy texture that pretzel rolls are known for. If you’re using a stand mixer, knead on medium speed for about 5 minutes until the dough pulls away from the sides of the bowl and forms a cohesive ball.
First Rise
Once your dough is kneaded, it’s time for the first rise. Lightly oil a large bowl and place the dough inside, turning it to coat with oil. Cover the bowl with a clean kitchen towel or plastic wrap and let it rise in a warm, draft-free place until it doubles in size. This usually takes about 1 to 1.5 hours, depending on the ambient temperature. Optimal conditions for rising include a warm kitchen or placing the bowl in an oven preheated to 200°F and then turned off.
Shaping the Rolls
After the dough has risen, it’s time to shape your rolls. Gently punch down the dough to release any air bubbles, then turn it out onto a lightly floured surface. Divide the dough into 12 equal pieces for large rolls or about 16 pieces for smaller rolls. To shape each piece, start by flattening it slightly, then fold the edges toward the center, creating a smooth ball. Flip the dough seam side down and roll it gently against the surface to tighten the shape. Uniformity is key here, as it ensures even baking and a beautiful presentation.
Second Rise
Once all the rolls are shaped, place them on a baking sheet lined with parchment paper. Cover them loosely with a kitchen towel and let them rise again for about 30-45 minutes. This second rise is crucial for achieving light and fluffy rolls, ensuring that they expand properly before boiling.
Preparing the Baking Soda Bath
While your rolls are rising, prepare the baking soda bath. Fill a large pot with water and bring it to a boil. Once boiling, add about 1/2 cup of baking soda. This step is essential as it gives the pretzel rolls their characteristic flavor and dark brown color. The baking soda increases the alkalinity of the water, which helps to create that coveted crust.
Boiling the Rolls
Carefully lower each roll into the boiling baking soda bath, making sure not to overcrowd the pot. Boil the rolls for about 30 seconds on each side, using a slotted spoon to flip them. This brief boiling creates the signature pretzel exterior that contrasts beautifully with the soft interior. After boiling, return the rolls to the baking sheet, ensuring they are evenly spaced.
Applying the Egg Wash and Salt
To achieve a beautiful golden brown color and a glossy finish, brush the tops of the rolls with an egg wash made from one egg mixed with a tablespoon of water. Use a pastry brush for even coverage. After applying the egg wash, sprinkle coarse sea salt on top for flavor. This not only enhances the taste but also gives a delightful crunch.
Baking
Preheat your oven to 425°F (220°C), and bake the rolls for about 15-20 minutes, or until they are golden brown. Keep an eye on them; the perfect indicator of doneness is a deep golden color and a slightly firm crust. If you have an instant-read thermometer, the internal temperature of the rolls should be around 190°F (88°C) when they are fully baked.
Cooling and Serving
Once baked, remove the rolls from the oven and allow them to cool slightly on a wire rack. This cooling step is important as it helps the rolls set and maintain their shape. Serve the pretzel rolls warm for the best experience. They can be enjoyed on their own or paired with various dips and spreads.
The Science Behind the Perfect Pretzel Roll
Understanding the science behind each ingredient and step can elevate your baking game. The yeast not only helps the dough rise but also ferments the sugars, contributing to the flavor. The development of gluten during kneading is vital for creating that chewy texture we all love.
Furthermore, the Maillard reaction is what gives your pretzel rolls their beautiful golden-brown crust. This chemical reaction occurs between amino acids and reducing sugars when exposed to heat, resulting in complex flavors and a rich color.
Serving Suggestions and Pairing Ideas
Pretzel rolls are incredibly versatile. Here are some creative ways to serve them:
– Dipping Sauces: Pair your pretzel rolls with a variety of dips. Mustard, cheese sauce, or a spicy sriracha mayo can complement the salty flavors beautifully.
– Spreads: Consider using herb-infused butter or garlic spread to enhance their taste. For a sweet option, try serving them with honey or fruit preserves.
– Complementary Dishes: These rolls are excellent alongside soups and stews, like a hearty chili or creamy potato soup. They can also be a delightful addition to a charcuterie board, providing a unique texture contrast to meats and cheeses.
If you find yourself with leftover rolls, don’t worry! They can be transformed into delicious croutons for salads or soups, or even used as a base for sliders. Simply slice them in half, fill them with your favorite meats and toppings, and enjoy!
Conclusion
Making soft and chewy pull-apart pretzel rolls at home is a rewarding experience that combines simple ingredients with a bit of technique. The joy of pulling apart a warm, fresh roll is unmatched, and the satisfaction of serving them to your family or guests is even greater. Embrace the process of baking, knowing that with each step, you’re creating something delicious and comforting. Whether enjoyed fresh out of the oven or transformed into a new dish the next day, these pretzel rolls are sure to become a beloved staple in your home. So gather your ingredients, get your hands a little doughy, and enjoy the delightful results of your efforts!