Indulge in the rich and creamy flavors of Decadent No Bake Turtle Mini Cheesecakes, a perfect treat for any occasion. Combining the lusciousness of cheesecake with the irresistible toppings of chocolate, caramel, and nuts, these mini desserts are not only easy to prepare but also visually stunning. Ideal for parties, family gatherings, or simply satisfying your sweet tooth, these mini cheesecakes are sure to impress. This article will guide you through the process of making these delightful cheesecakes, exploring each component in detail, ensuring that even novice bakers can achieve a gourmet dessert.
Understanding the Appeal of No Bake Cheesecakes
Exploring the Advantages of No Bake Desserts
No bake desserts have gained immense popularity in recent years, and for good reason. They offer a myriad of advantages that make them a go-to choice for both experienced bakers and those just beginning their culinary journey. One of the primary benefits is the time-saving aspect. Preparing a no bake cheesecake requires significantly less time than traditional baked versions. There’s no waiting around for an oven to preheat, and you won’t have to deal with the long process of baking and cooling.
Another perk of no bake desserts is the convenience they offer. Since you don’t need an oven, these recipes can be made in almost any kitchen setting, making them perfect for small spaces or during hot weather when turning on the oven is less than appealing. With no baking equipment required, all you need is a mixing bowl, a whisk, and a few basic utensils. This simplicity allows anyone to whip up a delicious dessert without the need for extensive baking knowledge or specialized tools.
Why Turtle Flavor Combinations Are Irresistible
The flavor combination of chocolate, caramel, and nuts is a classic that has stood the test of time, and it is easy to see why. The rich, velvety chocolate pairs beautifully with the sweet, gooey caramel, while the crunch of nuts adds a delightful texture contrast. This trifecta of flavors creates a mouthwatering experience that is both nostalgic and satisfying, appealing to a wide audience.
Turtle desserts are particularly popular due to their comforting and familiar taste. Many people associate these flavors with childhood treats or family gatherings, making them a perfect choice for creating new memories. The combination of sweet and salty, along with creamy and crunchy textures, elevates these mini cheesecakes to a level of decadence that is hard to resist.
Ingredients Breakdown for Turtle Mini Cheesecakes
To create the perfect Decadent No Bake Turtle Mini Cheesecakes, it’s essential to understand the role of each ingredient in the recipe. We will break down the necessary components for the crust, filling, and toppings, ensuring that you have a well-rounded understanding of what goes into these delicious treats.
Detailed Overview of the Crust Ingredients
The crust is the foundation of your mini cheesecakes, providing both flavor and structure. The primary ingredients for the crust include:
– Graham Cracker Crumbs: These serve as the base of your crust. They add a subtle sweetness and a crunchy texture that perfectly complements the creamy cheesecake filling. Using finely crushed graham crackers ensures that the crust holds together well and provides a delightful crunch.
– Cocoa Powder: To enhance the chocolate flavor of the crust, cocoa powder is incorporated. This ingredient not only adds depth to the flavor but also contributes to the rich, dark color of the crust. It’s important to use unsweetened cocoa powder to maintain the right balance of sweetness in the overall dessert.
– Sugar: A small amount of granulated sugar is added to the crust mixture to enhance its sweetness and flavor. This sweetness balances the richness of the cheesecake filling and complements the chocolate and caramel toppings.
– Melted Butter: Butter acts as the binding agent for the crust ingredients. When combined with the graham cracker crumbs, cocoa powder, and sugar, melted butter helps create a cohesive mixture that can be pressed into the bottom of your mini cheesecake pans. It adds richness and flavor while ensuring that the crust holds its shape once chilled.
In-Depth Look at the Cheesecake Filling
The cheesecake filling is the star of the show, and it’s crucial to get the balance of flavors and textures just right. The key ingredients for the filling are:
– Softened Cream Cheese: The foundation of the cheesecake filling, softened cream cheese brings a rich, creamy texture that is essential for any cheesecake. It’s important to allow the cream cheese to come to room temperature before mixing, as this will help create a smooth and lump-free filling.
– Powdered Sugar: Also known as icing sugar, powdered sugar is used to sweeten the cheesecake filling. Its fine texture allows it to dissolve easily, ensuring that the filling maintains a smooth consistency without any grittiness. Adjust the amount to your preference for sweetness.
– Vanilla Extract: A splash of vanilla extract enhances the overall flavor profile of the cheesecake. It adds warmth and depth, elevating the sweetness of the cream cheese and balancing the rich flavors of chocolate and caramel.
– Whipping Cream: Whipping cream is whipped until soft peaks form and then folded into the filling mixture. This step is crucial, as it lightens the texture of the cheesecake, making it airy and creamy. The whipped cream adds volume and a luscious mouthfeel that complements the dense cream cheese.
Exploring Topping Ingredients
The toppings are what truly make these mini cheesecakes a “turtle” dessert. They add layers of flavor and texture that are irresistible. Here’s what you’ll need:
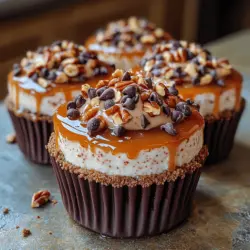
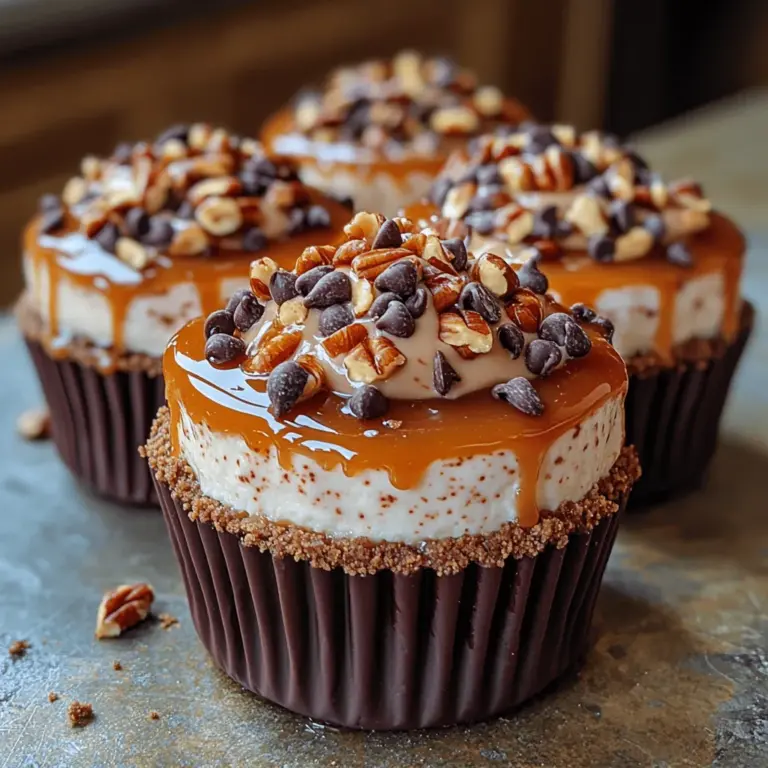
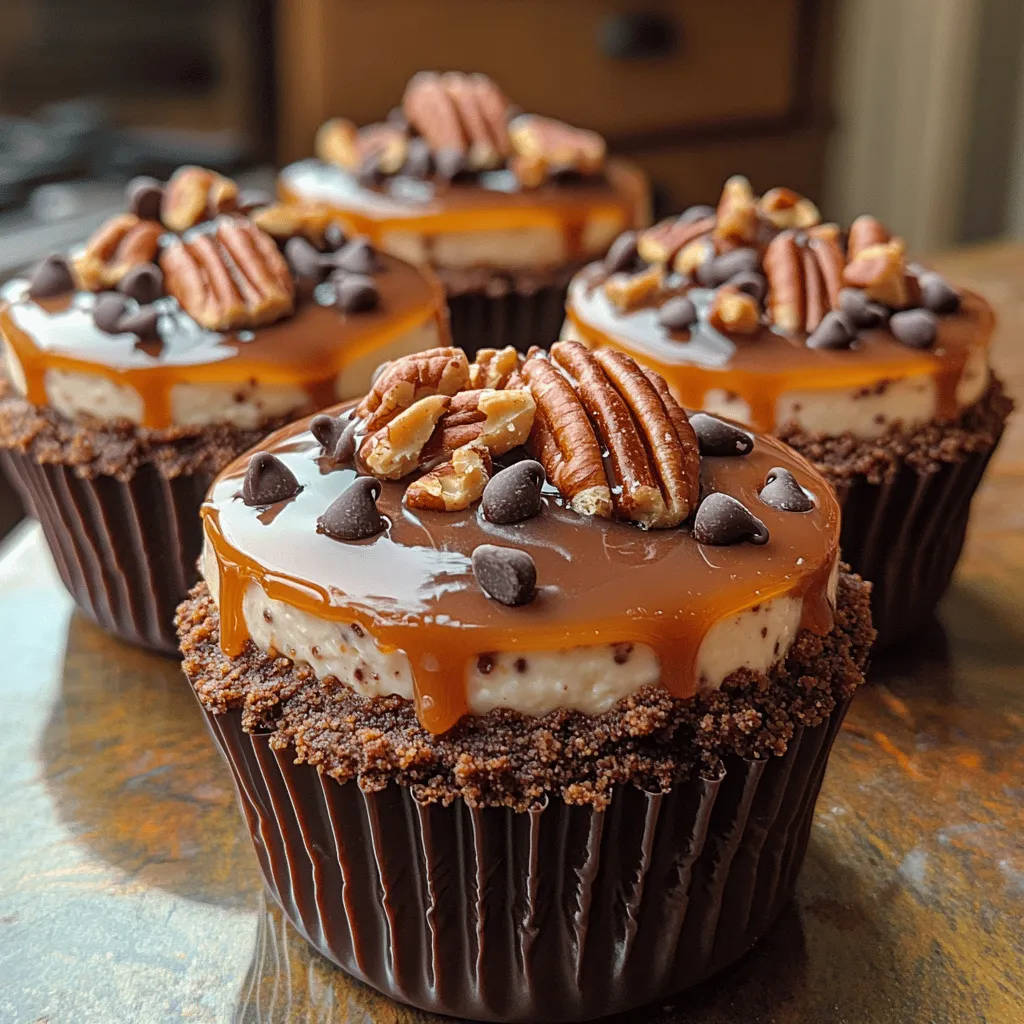
– Nuts: The choice of nuts is essential for achieving that signature turtle flavor. Pecans are the traditional choice, offering a rich, buttery flavor that pairs beautifully with chocolate and caramel. However, walnuts can also be used for a slightly different flavor profile. Toasting the nuts before use enhances their flavor and adds an extra crunch.
– Caramel Sauce: A generous drizzle of caramel sauce is a must for these mini cheesecakes. You can either use store-bought caramel sauce for convenience or make your own from scratch for a more gourmet touch. Homemade caramel sauce allows you to control the sweetness and achieve a rich, buttery flavor that elevates the dessert.
– Chocolate Sauce: Similar to caramel, chocolate sauce adds layers of indulgence to your mini cheesecakes. You can opt for store-bought chocolate sauce or a homemade version. The richness of chocolate complements the sweetness of caramel and provides a decadent finish.
– Optional Garnishes: For an extra touch, consider adding mini chocolate chips or additional crushed nuts as a garnish. These small details not only enhance the appearance of your cheesecakes but also provide an extra burst of flavor and texture.
Step-by-Step Instructions for Crafting the Cheesecakes
Once you have gathered all your ingredients, it’s time to start the process of creating these delicious No Bake Turtle Mini Cheesecakes. The following step-by-step instructions will ensure that you achieve the perfect balance of flavors and textures in your mini desserts.
1. Prepare the Crust: In a mixing bowl, combine the graham cracker crumbs, cocoa powder, granulated sugar, and melted butter. Mix until the ingredients are well combined and resemble wet sand. Press the mixture firmly into the bottom of your mini cheesecake pans or muffin tins to create an even layer. Place the crust in the refrigerator to set while you prepare the filling.
2. Make the Cheesecake Filling: In a large mixing bowl, beat the softened cream cheese until smooth and creamy. Gradually add the powdered sugar and vanilla extract, mixing until fully incorporated. In a separate bowl, whip the heavy cream until soft peaks form. Gently fold the whipped cream into the cream cheese mixture until well blended. Be careful not to deflate the whipped cream to maintain the lightness of the filling.
3. Assemble the Cheesecakes: Remove the crust from the refrigerator and spoon the cheesecake filling over the crust, smoothing the top with a spatula. Cover the mini cheesecakes with plastic wrap or a lid and return them to the refrigerator to chill for at least 4 hours, or overnight for the best results.
4. Add Toppings: Once the cheesecakes are set, remove them from the refrigerator and carefully remove them from the pans. Drizzle caramel sauce and chocolate sauce over the top of each cheesecake. Sprinkle with your choice of toasted nuts and any additional garnishes you desire, such as mini chocolate chips.
5. Serve and Enjoy: Your Decadent No Bake Turtle Mini Cheesecakes are now ready to be served! Arrange them on a platter and watch as your guests indulge in these delightful treats.
With these detailed steps and insights into the ingredients, you’ll be well on your way to crafting a dessert that is not only delicious but also impressively elegant. Stay tuned for the next part of this article, where we will delve deeper into tips for achieving the best results and answer some common questions about these delectable mini cheesecakes.
Preparing the Crust with Care
Creating the perfect crust for your Decadent No Bake Turtle Mini Cheesecakes is a crucial step in achieving that delightful balance of flavors and textures. Begin by mixing your graham cracker crumbs with melted butter and a touch of sugar. This combination not only binds the crumbs together but also enhances the overall flavor profile of the crust.
Detailed Mixing Techniques
For the best results, use a food processor to finely crush the graham crackers into a consistent crumb. This not only saves time but helps you avoid any large pieces that can disrupt the texture of your crust. Once you’ve achieved a fine crumb, transfer it to a mixing bowl and add the melted butter and sugar.
Using a fork, mix these ingredients thoroughly until the crumbs are evenly coated. The mixture should resemble wet sand; if it feels too dry, add a bit more melted butter, one teaspoon at a time, until you reach the desired consistency.
Tips for Achieving an Even Crust
When it comes to pressing the crust into your mini cheesecake cups, evenness is key. Use the bottom of a measuring cup or the back of a spoon to press the mixture firmly and evenly into the base of each cup. Aim for a thickness of about a quarter-inch. This will ensure that your cheesecakes have a sturdy foundation and can hold up to the creamy filling. For added precision, you can chill the crust briefly in the refrigerator for about 10 minutes before adding the filling. This helps it firm up and makes it easier to work with.
Making the Cheesecake Filling
The filling of your mini cheesecakes is where the magic truly happens. A smooth and creamy filling will provide the perfect complement to your crunchy crust.
Importance of Mixing Techniques
Start by beating the cream cheese at room temperature until it’s completely smooth. This step is essential; if the cream cheese is cold, you’ll end up with lumps in your filling. To this, add in your powdered sugar, vanilla extract, and a pinch of salt. Beat until fully combined. The salt will enhance the sweetness of the mixture, striking a perfect balance.
In a separate bowl, whip your heavy cream until stiff peaks form. This is where you’ll achieve that light and airy texture that makes no-bake cheesecakes so delightful. Be careful not to over-whip; you want the cream to hold its shape without turning into butter.
How to Properly Fold Whipped Cream into the Mixture
Folding is a gentle mixing technique that preserves the air you’ve incorporated into the whipped cream. Using a rubber spatula, add a third of the whipped cream to the cream cheese mixture. Gently lift and fold the mixture over itself, turning the bowl as you go. Repeat this process until all the whipped cream is incorporated. The filling should be light and fluffy, with no streaks of cream remaining.
Assembling the Cheesecakes
With your crust and filling ready, it’s time to assemble your mini cheesecakes. This step is all about presentation and ensuring that each cup is filled uniformly.
Techniques for Filling the Cups
Using a piping bag fitted with a large round tip can make filling the cups easier and neater. If you don’t have a piping bag, a zip-top bag with the corner snipped off works just as well. Start by filling each cup about three-quarters full, leaving room for your toppings.
Tips for Achieving a Smooth Finish
To achieve a smooth, professional-looking finish, use a small offset spatula to gently spread the filling to the edges of each cup. This will not only create a beautiful appearance but also make room for the toppings. Once filled, tap the cups lightly on the counter to remove any air bubbles and ensure an even surface.
Adding the Perfect Toppings
The final touch to your mini cheesecakes is the toppings. This is where you can get creative and add those signature turtle flavors.
Strategies for Drizzling Sauces Evenly
To achieve an attractive drizzle of chocolate and caramel sauce, use squeeze bottles or a piping bag. Start by drizzling one sauce over the filling, then the other, to create a beautiful pattern. You can also use a toothpick to swirl the sauces together for an artistic touch.
Creative Ways to Present the Cheesecakes
For an elevated presentation, consider garnishing your cheesecakes with chopped pecans or walnuts, a sprinkle of sea salt, or even a dollop of whipped cream on top. These finishing touches add texture and visual appeal, making your mini cheesecakes even more inviting.
Chilling and Serving Your Cheesecakes
Once your mini cheesecakes are assembled and topped, they need to chill before serving. This step is crucial for flavor development and achieving the right consistency.
Understanding the Chilling Process
Chilling your cheesecakes allows the filling to set properly, making them easier to remove from the cups and ensuring that each bite is creamy and firm. Ideally, let them chill in the refrigerator for at least 4 hours, but overnight is even better if you can wait. This longer chilling time allows the flavors to meld beautifully, enhancing the overall taste experience.
Time Considerations for Serving
If you’re short on time, aim for the minimum chilling time of 4 hours, but keep in mind that the longer they set, the better they will be. If you plan to serve these at a gathering, you can prepare them a day in advance, leaving you with more time to enjoy the event with your guests.
Serving Suggestions for Mini Cheesecakes
When it comes to serving your Decadent No Bake Turtle Mini Cheesecakes, there are several creative ways to present them that will wow your guests.
Ideas for Presentations and Pairings
Consider serving these mini cheesecakes on a decorative platter, perhaps adding a few extra drizzles of chocolate and caramel around the edges for a stunning visual effect. Pair them with fresh fruit, such as strawberries or raspberries, which provide a refreshing contrast to the richness of the cheesecake.
For a more festive touch, you can even add edible gold leaf or chocolate shavings on top of the whipped cream. These small details can elevate your presentation and make your dessert feel extra special.
Best Practices for Removing from Liners
If you’ve used cupcake liners, gently peel them away just before serving to avoid any mess. If you find that some liners stick, a quick dip in warm water can help release them without damaging the cheesecake. Serve immediately after removing the liners for the best texture and freshness.
Nutritional Information and Servings
Understanding the nutritional content of your Decadent No Bake Turtle Mini Cheesecakes can help you enjoy them responsibly.
Overview of the Nutritional Content
Each mini cheesecake contains approximately 200 calories, with about 12 grams of fat and 15 grams of sugar. While these treats are indulgent, they are also rich in flavor, allowing you to enjoy a satisfying dessert experience without overindulging.
Discussion on Portion Sizes in the Context of Treats
These mini cheesecakes are designed to be enjoyed in moderation. Their small size makes them the perfect treat for satisfying a sweet craving without consuming an entire slice of cake. Pair them with a cup of coffee or tea to enhance your dessert experience and savor each delicious bite.
Conclusion: Indulging in Decadent No Bake Turtle Mini Cheesecakes
In conclusion, Decadent No Bake Turtle Mini Cheesecakes are a delectable way to enjoy a classic dessert with minimal effort. Their easy preparation, combined with the heavenly flavors of chocolate, caramel, and nuts, make them a must-try for any dessert lover. Whether for a special occasion or a simple treat at home, these mini cheesecakes are sure to impress and satisfy. Embrace your creativity in the kitchen and indulge in these delightful desserts that promise a burst of flavor in every bite. Enjoy the rich, creamy texture and the perfect blend of sweetness and crunch, making these cheesecakes a favorite for all your gatherings.