No-Bake Oreo Cookie Dough Bars: The Ultimate Dessert Delight
 Save
Save
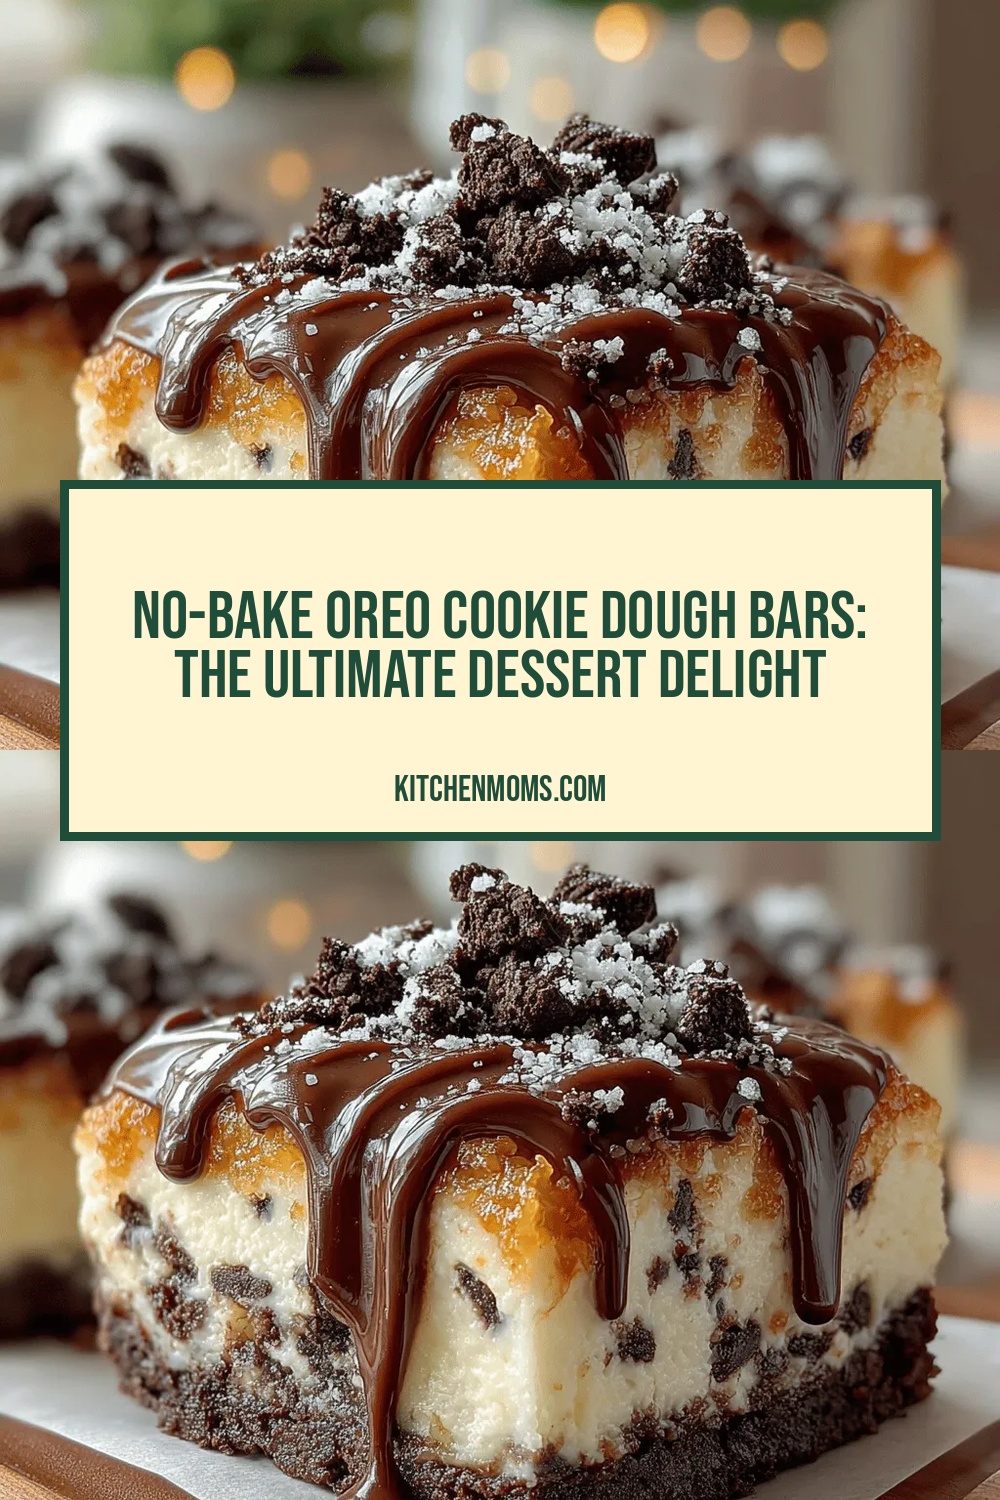
Craving a dessert that feels indulgent without the hassle of an oven? Meet the No‑Bake Oreo Cookie Dough Bars – a sweet, creamy treat that delivers all the comfort of classic cookie dough with the unmistakable crunch of Oreo® cookies.
What makes these bars truly special is the perfect marriage of raw‑like chocolate cookie dough, a buttery shortbread base, and a glossy chocolate ganache drizzle. Each bite offers a texture contrast that’s both soft and satisfyingly crunchy.
This dessert is perfect for kids’ birthday parties, a casual movie night, or a quick finish to a dinner party when you need something impressive yet effortless.
The process is straightforward: blend a few pantry staples, press the mixture into a pan, chill until firm, then top with ganache. No baking, no mess, and the result is a bar that looks as good as it tastes.
Why You'll Love This Recipe
Zero‑Bake Simplicity: No oven, no stovetop, just a quick chill. Perfect for hot summer days or kitchens without a working oven, yet the result feels bakery‑level.
Irresistible Texture Layers: Creamy cookie dough meets buttery crust and a glossy chocolate glaze, creating a multi‑dimensional bite that keeps you reaching for more.
Customizable Sweetness: Adjust the amount of sweetened condensed milk or swap the dark ganache for white chocolate to match any palate.
Kid‑Friendly Fun: Safe, no‑cook preparation makes it a great activity for kids to help with, fostering confidence and a love for homemade desserts.
Tips & Tricks
Perfecting the Recipe
Chill the crust. A cold crust prevents the buttery base from becoming soggy when the warm filling is added, ensuring a clean bite every time.
Use room‑temperature butter for the filling. Softened butter incorporates smoothly with the condensed milk, creating that silky “raw dough” texture.
Flavor Enhancements
Add a teaspoon of espresso powder to the ganache for a subtle coffee note that deepens the chocolate flavor. A drizzle of caramel sauce or a sprinkle of toasted coconut on top adds an unexpected layer of richness.
Common Mistakes to Avoid
Avoid over‑mixing the Oreo crumbs; doing so can turn the filling gritty. Also, don’t skip the chilling step—without adequate time to set, the bars will crumble when you try to slice them.
Pro Tips
Warm the knife. Dip the blade in hot water, dry, and slice. This prevents the ganache from cracking and gives clean edges.
Use high‑quality chocolate. A good dark chocolate (70% cacao) provides a richer flavor and a smoother ganache.
Line the pan with parchment. This makes removal effortless and keeps the bars intact.
Store in single layers. If you need to stack bars, place parchment sheets between layers to avoid sticking.
Variations
Ingredient Swaps
Swap the classic Oreo® for chocolate wafer cookies to change the flavor profile, or use peanut‑butter cups crushed into the filling for a salty‑sweet twist. For a lighter ganache, replace heavy cream with coconut milk and use white chocolate chips for a pastel finish.
Dietary Adjustments
For gluten‑free bars, use gluten‑free all‑purpose flour and ensure the Oreo‑style cookies are certified gluten‑free. Vegan versions replace butter with coconut oil and use a plant‑based condensed milk (e.g., coconut condensed milk); choose dairy‑free chocolate for the ganache.
Serving Suggestions
Pair the bars with a dollop of whipped cream or a scoop of vanilla ice cream for extra indulgence. A drizzle of raspberry coulis adds a bright, fruity contrast. For a festive touch, sprinkle edible gold leaf on top before serving.
Storage Info
Leftover Storage
Allow any remaining bars to cool completely, then lift them out of the pan using the parchment overhang. Store in an airtight container in the refrigerator for up to 5 days. For longer keeping, wrap individual bars in plastic wrap and freeze for up to 2 months; this preserves both texture and flavor.
Reheating Instructions
To enjoy a chilled bar warm, place it on a microwave‑safe plate, cover loosely with a damp paper towel, and heat on medium for 20‑30 seconds. Alternatively, warm the whole slab in a 300°F oven for 8‑10 minutes, which softens the ganache without melting the filling.
Frequently Asked Questions
Can I make these bars ahead of time?
What if I don’t have sweetened condensed milk?
Can I use a different type of chocolate for the ganache?
How do I keep the bars from sticking to the pan?
This No‑Bake Oreo Cookie Dough Bar recipe delivers a crowd‑pleasing dessert with minimal effort, thanks to a simple crust, a creamy cookie‑dough layer, and a glossy chocolate ganache. We’ve covered every detail—from ingredient choices to storage tips—so you can confidently create perfect bars every time. Feel free to experiment with swaps and toppings; the best desserts are those you make your own. Slice, serve, and savor every indulgent bite!
No-Bake Oreo Cookie Dough Bars: The Ultimate Dessert Delight
Delicious No-Bake Oreo Cookie Dough Bars: The Ultimate Dessert Delight
Ingredients
Shortbread Crust
- 1 cup (115 g) all‑purpose flour
- ¼ cup (55 g) granulated sugar
- ⅓ cup (75 g) unsalted butter, melted
- ¼ teaspoon salt
Cookie Dough Filling
- ½ cup (115 g) unsalted butter, softened
- ⅓ cup (80 ml) sweetened condensed milk
- 1 teaspoon pure vanilla extract
- 1 ¾ cups (≈30) Oreo® cookies, crushed
Chocolate Ganache
- ½ cup (120 ml) heavy cream
- ¾ cup (135 g) dark chocolate chips or chopped dark chocolate
- 1 tablespoon unsalted butter (optional, for shine)
Instructions
Assembling the Bars
- Spread the filling. Transfer the cookie‑dough mixture onto the chilled crust, smoothing it into an even layer with a spatula. The filling should be about ½‑inch thick for a perfect bite‑size ratio.
- Make the ganache. In a small saucepan, bring the heavy cream to a gentle simmer over medium heat. Remove from heat and pour over the chocolate chips. Let sit for 1 minute, then stir until smooth. Add butter if you desire extra shine.
- Drizzle the ganache. Pour the warm ganache over the cookie‑dough layer, using a spoon to create a swirl pattern. Tilt the pan slightly to help the ganache spread evenly.
- Chill to set. Cover the pan with plastic wrap and refrigerate for at least 2 hours, or until the ganache is firm and the bars hold together when cut.
- Slice and serve. Using a sharp knife warmed in hot water (dry before cutting), slice the chilled slab into 12 equal bars. Serve immediately or keep chilled until ready to enjoy.
Similar Recipes
 Desserts
Pumpkin Cheesecake Magic Bars
Discover how to make velvety pumpkin cheesecake magic bars with a buttery crust, creamy filling, and…
 Desserts
Sticky Pear and Ginger Cake for Cozy Nights at Home
Learn how to make delicious Sticky Pear and Ginger Cake for Cozy Nights at Home. Easy…
 Desserts
Buttery Pecan Delight Cookies: The Irresistible Allure of a Classic Treat
Delicious Buttery Pecan Delight Cookies: The Irresistible Allure of a Classic Treat
 Desserts
Decadent Fudge Brownies: A Timeless Dessert Favorite
Delicious Decadent Fudge Brownies: A Timeless Dessert Favorite
 Desserts
Valentines Desserts for Two: 5 Sweet Treats to Share
Learn how to make delicious Valentines Desserts for Two: 5 Sweet Treats to Share. Easy recipe…
 Desserts
Crispy Bliss: Apple Cinnamon Crumble Snack Bars
Delicious Crispy Bliss: Apple Cinnamon Crumble Snack Bars
 Desserts
Cheesy Honey Glazed Sweet Potato Delight
Delicious Cheesy Honey Glazed Sweet Potato Delight
 Desserts
Chocolate Cake with Strawberry Filling
Learn how to make delicious Chocolate Cake with Strawberry Filling. Easy recipe with step-by-step instructions.

Lucy
I cook these recipes at home before they ever land here — simple ingredients, clear steps.