Peppermint Meltaways
 Save
Save
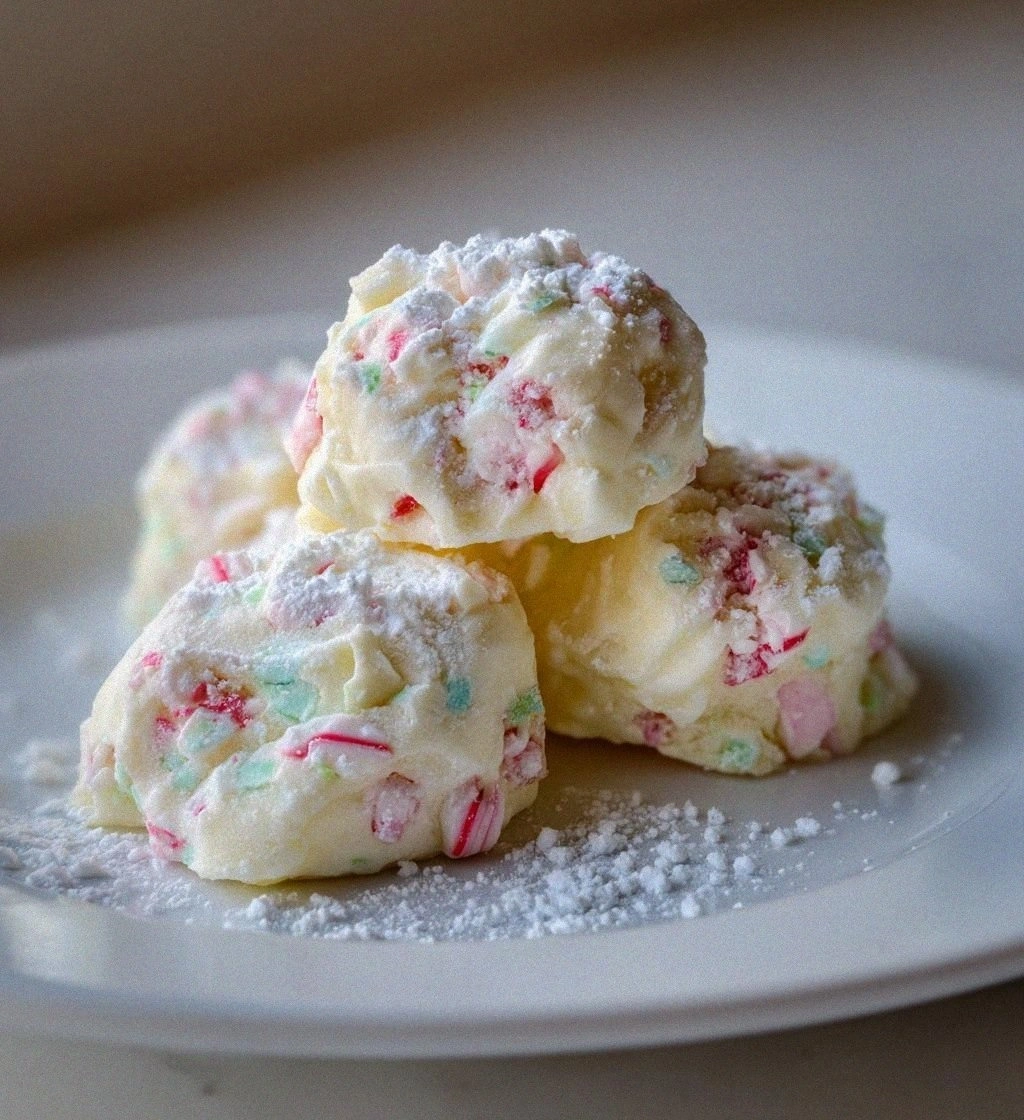
It was a chilly December evening, the kind where the wind whistles through the bare branches and the kitchen becomes the warm heart of the house. I remember pulling a tray of golden‑brown cookies from the oven, the scent of butter and peppermint swirling together like a festive hug that wrapped around my entire family. The moment I lifted the lid, a cloud of fragrant steam hit me, and I could see the sparkle in my children’s eyes as they reached for the first meltaway. That first bite—soft, buttery, with a burst of cool peppermint that melted on the tongue—was the spark that turned a simple holiday treat into a beloved family tradition.
Since that night, I’ve been perfecting what I now call “Peppermint Meltaways,” a cookie that’s crisp on the edges, chewy in the center, and speckled with crunchy peppermint candy bits that crackle like tiny snowflakes. What makes this recipe truly special is its balance of textures: the buttery dough gives you that melt‑in‑your‑mouth feeling, while the crushed peppermint candies add a surprising crunch that keeps you reaching for more. Have you ever wondered why store‑bought versions never quite capture that same magic? The secret lies in the simplicity of the ingredients and a few tricks I’ve learned over the years.
But wait—there’s a hidden step that takes these cookies from good to unforgettable, and I’m not going to reveal it just yet. Imagine the aroma of fresh peppermint wafting through your home, the way the cookies crackle as you bite into them, and the smiles that follow. The best part? You don’t need any fancy equipment, just a few pantry staples and a dash of patience. And because I love sharing, I’ve packed this article with tips, variations, and even a few cautionary notes so you can avoid the common pitfalls that trip up even seasoned bakers.
Here’s exactly how to make it — and trust me, your family will be asking for seconds, thirds, and maybe even a whole batch for later. Ready to dive in? Let’s start with why this recipe works so well, then we’ll break down each ingredient, walk through the step‑by‑step process, and finish with expert tips that will make your Meltaways the star of any gathering.
🌟 Why This Recipe Works
- Flavor Depth: The combination of unsalted butter and peppermint extract creates a layered taste where the buttery richness is brightened by a cool, refreshing mint note that lingers long after the last bite.
- Texture Harmony: By using both powdered sugar and a modest amount of salt, the dough stays tender while developing a slight crispness on the edges, giving you that coveted melt‑away sensation.
- Ease of Preparation: The recipe requires only a single bowl for mixing, which means less cleanup and more time to enjoy the process with loved ones.
- Time Efficiency: With a total time of about 45 minutes, you can have fresh, aromatic cookies ready while the kids finish their homework or while the holiday music plays in the background.
- Versatility: The base dough can be adapted for other flavors—think chocolate, orange, or even a coffee twist—making it a flexible canvas for creative bakers.
- Ingredient Quality: Using high‑quality butter and real peppermint extract (instead of artificial flavor) elevates the entire cookie, delivering a richer, more authentic taste.
- Crowd‑Pleasing Factor: The bright specks of crushed peppermint candy add visual appeal and a festive crunch that kids and adults alike adore, especially during the holiday season.
🥗 Ingredients Breakdown
The Foundation
The first hero of our recipe is unsalted butter, softened. Butter provides the rich, creamy base that gives each meltaway its melt‑in‑your‑mouth quality. Using unsalted butter lets you control the salt level precisely, ensuring the flavor isn’t overly salty. If you’re looking for a dairy‑free alternative, try a high‑fat coconut oil, but keep in mind the flavor profile will shift slightly toward tropical notes. When selecting butter, choose one that’s fresh and has a pale yellow hue, indicating a higher butterfat content.
Next up is powdered sugar, which dissolves effortlessly into the butter, creating a smooth, silky dough. Unlike granulated sugar, powdered sugar prevents any grainy texture and helps the cookies spread just enough to form that delicate edge. If you don’t have powdered sugar on hand, you can blitz granulated sugar in a blender for a few seconds, but sift it well to avoid clumps. The fine texture also contributes to the subtle sweetness that lets the peppermint shine without being overpowered.
Aromatics & Spices
A pinch of salt is the unsung hero that amplifies every other flavor in the dough. Even a quarter‑teaspoon can make the buttery richness feel more balanced and prevent the sweetness from becoming cloying. I once omitted the salt entirely, and the cookies tasted flat—trust me, that’s a mistake you’ll want to avoid. Sea salt works beautifully, but if you only have table salt, that’s fine too; just be sure it’s finely ground.
Peppermint extract is where the magic truly begins. A little goes a long way—just a quarter‑teaspoon delivers a bright, cooling note that cuts through the richness of the butter. Be cautious not to overdo it; too much can become harsh and overpower the delicate balance. If you’re using a peppermint oil instead, dilute it with a bit of vanilla extract to tame its potency.
The Secret Weapons
All‑purpose flour gives structure to the cookies while keeping them tender. Two cups provide the perfect ratio to bind the butter and sugar without making the dough too dense. For a gluten‑free version, substitute with a 1‑to‑1 gluten‑free flour blend, but you might need a touch more butter to retain the melt‑away texture.
Crushed peppermint candies are the final flourish that adds a crunchy surprise in every bite. The tiny shards melt slightly during baking, releasing bursts of peppermint oil while leaving behind a subtle crunch. If you can’t find traditional peppermint candies, try crushed candy canes or even mint chocolate chips for a decadent twist. Always crush them just before mixing into the dough to keep the pieces from clumping together.
Finishing Touches
A final sprinkle of sea salt on top of each cookie just before baking can create a delightful contrast between sweet and salty, especially if you love that flavor dance. Some bakers also brush the tops with a light egg wash to achieve a glossy finish, but for meltaways, the natural sheen from the butter is more than enough. The key is to keep the dough chilled after mixing, which prevents the butter from melting too quickly in the oven, preserving that tender crumb.
With your ingredients prepped and ready, let's get cooking. Here's where the fun really begins...
🍳 Step-by-Step Instructions
🔐 Expert Tips for Perfect Results
The Taste Test Trick
Before you bake the entire batch, pull off one dough ball, bake it, and let it cool. This mini‑test lets you gauge the mint intensity and adjust the peppermint extract if needed. I once served a batch to a friend who loved mint, only to discover the flavor was a touch too subtle—this quick test saved the day.
Why Resting Time Matters More Than You Think
Chilling the dough isn’t just about preventing spreading; it also allows the butter to solidify and the flavors to meld. A rested dough yields a more uniform crumb and a richer peppermint aroma. Trust me on this one: the extra 30 minutes in the fridge makes the difference between a good cookie and a meltaway masterpiece.
The Seasoning Secret Pros Won’t Tell You
A pinch of fine sea salt sprinkled on top just before baking creates a subtle contrast that elevates the sweet‑mint profile. This technique is a favorite among pastry chefs who love that sweet‑salty dance on the palate. The salt also helps the peppermint candies caramelize just enough to give you that satisfying snap.
Baking Sheet Matters
Using a dark, non‑stick baking sheet can cause the cookies to brown faster, while a light-colored sheet gives a slower, more even bake. If you prefer a slightly crispier edge, go for a dark sheet, but watch them closely to avoid burning. I once switched to a dark sheet and ended up with a burnt bottom—lesson learned!
The Cool‑Down Curve
After the cookies have cooled on the rack, store them in an airtight container with a slice of fresh bread. The bread releases moisture that keeps the meltaways soft for days. This trick has saved many a batch from turning stale too quickly, especially during holiday gatherings when you need them to stay fresh.
🌈 Delicious Variations to Try
One of my favorite things about this recipe is how versatile it is. Here are some twists I've tried and loved:
Chocolate‑Peppermint Fusion
Swap half of the butter for melted dark chocolate and add a tablespoon of cocoa powder to the flour. The result is a deep, rich chocolate base that pairs beautifully with the peppermint shards, creating a classic holiday flavor combo that feels both indulgent and refreshing.
Citrus Peppermint Spark
Add the zest of one orange or lemon to the dough and replace half of the peppermint candies with candied citrus peel. The citrus brightens the mint, giving the cookies a lively, tangy edge that’s perfect for spring gatherings.
Nutty Crunch Delight
Fold in ½ cup of finely chopped toasted almonds or pecans along with the peppermint candies. The nuts introduce a buttery crunch that complements the soft meltaway texture and adds a layer of complexity to the flavor profile.
Coffee‑Mint Espresso
Incorporate 1 tablespoon of instant espresso powder into the dry ingredients and use a coffee‑infused peppermint extract. This variation gives the cookies a subtle coffee bitterness that balances the sweetness, making them an excellent after‑dinner treat.
White Chocolate Peppermint Swirl
Create a swirl by mixing melted white chocolate with a few drops of peppermint extract, then dollop it onto the dough before baking. The white chocolate creates a creamy ribbon that melts into the cookie, delivering pockets of sweet, minty decadence.
Savory Herb Twist
For a daring savory version, omit the peppermint extract and instead add 1 teaspoon of finely chopped rosemary and a pinch of smoked sea salt. The herbaceous notes transform the meltaway into a sophisticated appetizer that pairs well with cheese boards.
📦 Storage & Reheating Tips
Refrigerator Storage
Place cooled meltaways in an airtight container with a piece of parchment between layers. They will stay soft for up to 5 days. For extra freshness, add a slice of bread to the container; the bread releases just enough moisture to keep the cookies from drying out.
Freezing Instructions
Arrange the cookies in a single layer on a baking sheet and freeze until solid, then transfer them to a zip‑top freezer bag. They’ll keep for up to 3 months. When you’re ready to enjoy them, let them thaw at room temperature for 15 minutes, then give them a quick warm‑up in the oven.
Reheating Methods
To revive that melt‑away texture, preheat your oven to 300°F (150°C) and bake the cookies for 5–7 minutes. The trick to reheating without drying them out? A splash of melted butter brushed lightly over the tops before the final minute adds moisture and restores that buttery sheen.
❓ Frequently Asked Questions
Can I use fresh peppermint leaves instead of extract?
Why are my cookies spreading too much?
Can I make these gluten‑free?
How long can I keep the cookies fresh without refrigeration?
Can I add other mix‑ins like chocolate chips?
What’s the best way to crush peppermint candies?
Can I make these cookies vegan?
Why do my cookies turn out too soft after cooling?
Similar Recipes
 Desserts
Chocolate Cream Cheese Delight Brownies: A Decadent Dessert Experience
Delicious Chocolate Cream Cheese Delight Brownies: A Decadent Dessert Experience
 Desserts
Zesty Frozen Raspberry Lemonade Bars
Delicious Zesty Frozen Raspberry Lemonade Bars
 Desserts
Strawberry Cheesecake Crunch Bites
Learn how to make delicious Strawberry Cheesecake Crunch Bites. Easy recipe with step-by-step instructions.
 Desserts
Harvest Delight: Maple-Glazed Carrots
Delicious Harvest Delight: Maple-Glazed Carrots
 Desserts
Sweet Chocolate Almond Clusters Recipe: Delve Into the Details
Delicious Sweet Chocolate Almond Clusters Recipe: Delve Into the Details
 Desserts
Indulge in Nigella Italian Christmas Cake Bliss
Learn how to make delicious Indulge in Nigella Italian Christmas Cake Bliss. Easy recipe with step-by-step…
 Desserts
Frozen Yogurt S’mores Cookie Squares Recipe: The Ultimate Guide
Delicious Frozen Yogurt S’mores Cookie Squares Recipe: The Ultimate Guide
 Desserts
valentines themed cake: 7 Steps to Romantic Perfection
Learn how to make delicious valentines themed cake: 7 Steps to Romantic Perfection. Easy recipe with…

Lucy
I cook these recipes at home before they ever land here — simple ingredients, clear steps.
Other Reader Favorites
 Desserts
Sweet Apple Pie Protein Bites: Recipe Completion and Serving Suggestions
Delicious Sweet Apple Pie Protein Bites: Recipe Completion and Serving Suggestions
 Desserts
Caramel Pecan Oat Bars
Discover how to make caramel pecan oat bars with a buttery oat base, gooey caramel, and…
 Appetizers
Dreamy Creamy Mushroom Risotto Cakes: A Culinary Delight
Delicious Dreamy Creamy Mushroom Risotto Cakes: A Culinary Delight
 Dinner
Creamy Corn and Chicken Skillet Pie: Step-by-Step Instructions and Serving Suggestions
Delicious Creamy Corn and Chicken Skillet Pie: Step-by-Step Instructions and Serving Suggestions