Mini Cheeseburger Crescent Sliders: A Delicious and Easy Recipe
 Save
Save
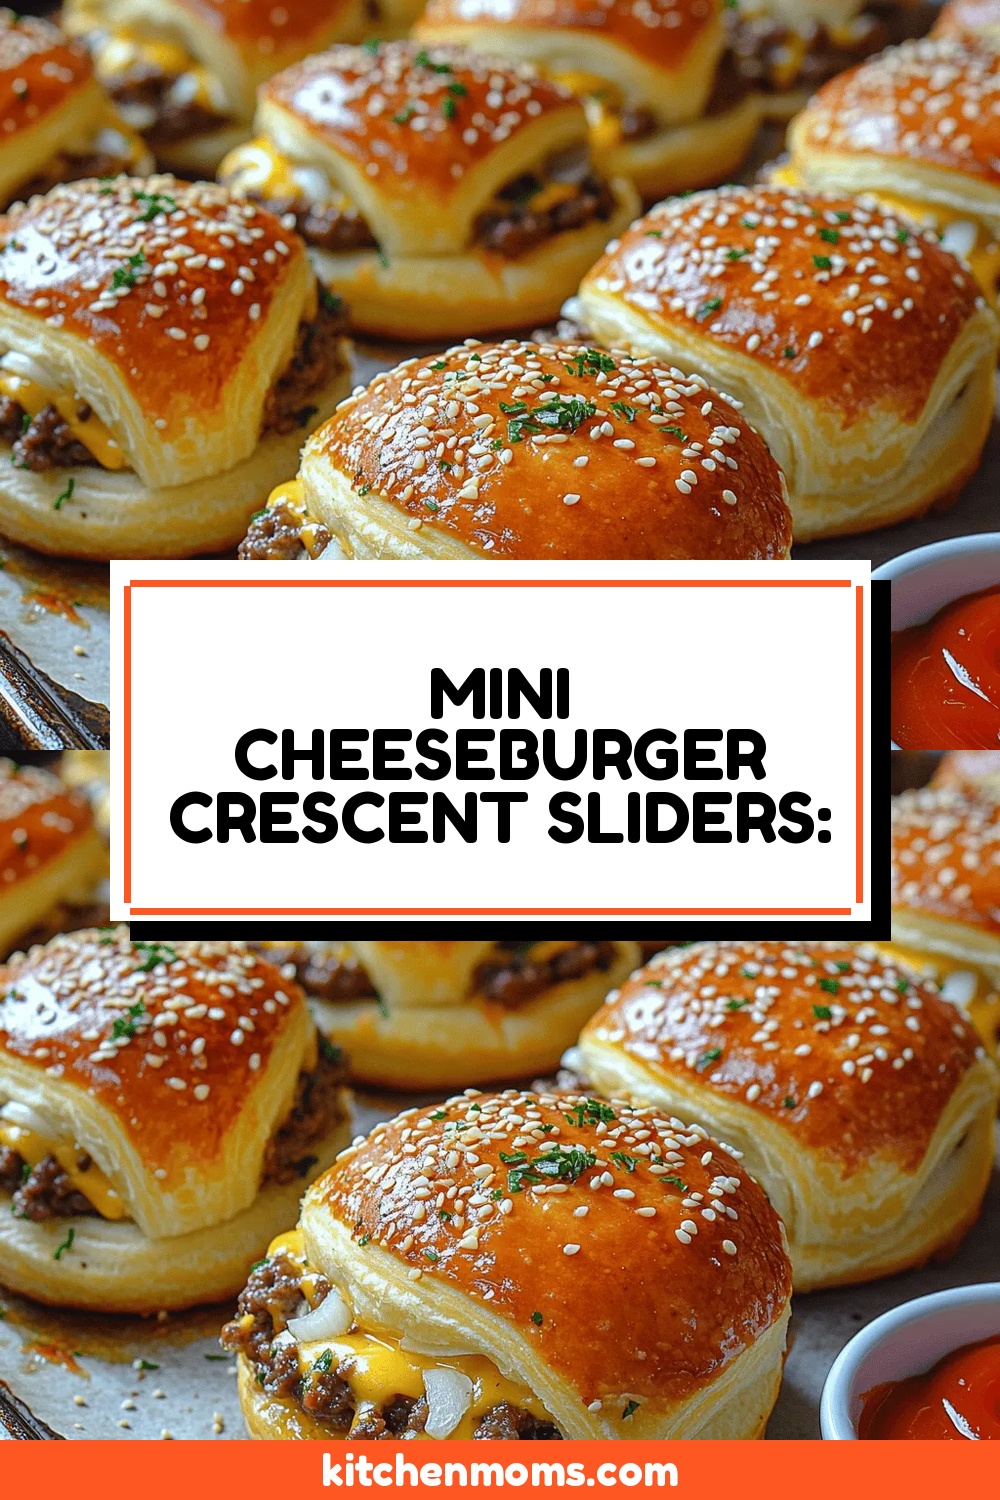
Imagine biting into a buttery, flaky crescent roll that’s stuffed with a juicy, cheesy cheeseburger patty—each mini‑slider is a handheld celebration of classic comfort food. These Mini Cheeseburger Crescent Sliders bring the beloved flavors of a backyard grill right to your kitchen countertop, and they do it in a fraction of the time.
What sets this recipe apart is the clever use of refrigerated crescent dough to create a golden, buttery crust that perfectly cradles a seasoned beef patty, melted cheddar, tangy pickles, and a dollop of special sauce. The result is a bite‑size masterpiece that’s both crunchy and succulent.
Everyone from picky kids to seasoned foodies will love these sliders, making them ideal for birthday parties, game‑day gatherings, casual brunches, or any moment you need a crowd‑pleasing finger food.
The cooking process is straightforward: shape the dough, assemble the fillings, bake until puffed and golden, and finish with a quick drizzle of sauce. In less than an hour you’ll have a tray of irresistible mini burgers that look as good as they taste.
Why You'll Love This Recipe
Irresistible Flavor Fusion: The buttery crescent dough pairs with seasoned beef, sharp cheddar, and a tangy sauce, delivering the classic cheeseburger experience in a bite‑size form.
Speedy Prep & Cook: From dough to finished sliders in under 45 minutes, this recipe fits perfectly into busy weeknights or last‑minute party planning.
Kid‑Friendly Fun: Mini size, familiar flavors, and a hands‑on eating experience make these sliders a hit with children and adults alike.
Customizable Canvas: Swap cheeses, add toppings, or tweak the sauce—each slider can be personalized to suit any palate or dietary need.
Tips & Tricks
Perfecting the Recipe
Pat the Beef Dry. Before seasoning, blot the ground beef with paper towels. Less moisture means a better sear inside the dough and a juicier patty.
Use Cold Butter for the Dough. Brush the dough with melted butter, not oil, to achieve a richer flavor and a more golden crust.
Don’t Overfill. A modest amount of filling prevents the dough from tearing and ensures a tidy, bite‑size result.
Pre‑heat the Oven. A fully heated oven creates the rapid steam needed for the crescent dough to puff dramatically.
Flavor Enhancements
Add a dash of Worcestershire sauce to the beef mixture for umami depth, or stir a pinch of cayenne into the special sauce for subtle heat. For extra richness, fold a tiny cube of butter into the cheese before placing it on the patty.
Common Mistakes to Avoid
Skipping the brief rest after baking can cause the cheese to ooze out, making the sliders messy. Also, avoid using a low‑fat ground beef; the fat is essential for flavor and moisture. Finally, don’t bake at too low a temperature—under‑baked dough stays soggy.
Pro Tips
Make a Mini “Bun” Substitute. If you prefer a softer interior, lightly brush the inside of each dough pocket with a mixture of milk and melted butter before adding the patty.
Use a Meat Thermometer. Aim for an internal temperature of 160°F (71°C) for safe, perfectly cooked beef.
Batch Prep. Shape and freeze the assembled sliders on a tray, then transfer to a zip‑top bag. Bake from frozen, adding 3‑4 extra minutes.
Serve Warm. The dough’s flakiness and cheese’s meltiness are at their peak within 15 minutes of leaving the oven.
Variations
Ingredient Swaps
Swap the beef for ground turkey or lamb for a different flavor profile, or use a plant‑based crumble for a vegetarian version. Replace cheddar with pepper jack for extra spice, or use Swiss for a milder melt. Pickle chips can be exchanged for caramelized onions or sautéed mushrooms for added depth.
Dietary Adjustments
For gluten‑free sliders, use a certified gluten‑free crescent dough or make a simple almond‑flour pastry. To keep it dairy‑free, substitute cheddar with dairy‑free cheese slices and use a vegan mayo in the sauce. Keto‑friendly cooks can replace the crescent dough with low‑carb almond‑flour biscuits and sweeten the sauce with a sugar substitute.
Serving Suggestions
Pair these sliders with sweet potato fries, a crisp coleslaw, or a simple cucumber‑mint salad. For a party platter, arrange them on a wooden board with assorted dipping sauces—spicy sriracha mayo, honey mustard, or a smoky BBQ glaze. A cold craft beer or sparkling lemonade completes the casual‑elegant vibe.
Storage Info
Leftover Storage
Allow the sliders to cool completely, then place them in an airtight container. In the refrigerator they stay fresh for 3‑4 days. For longer keeping, freeze them in a single layer on a baking sheet, then transfer to a zip‑top freezer bag; they’ll hold up to 2 months without losing texture.
Reheating Instructions
Reheat refrigerated leftovers in a 350°F oven, covered with foil, for 10‑12 minutes until warmed through. For frozen sliders, bake at 375°F for 15‑18 minutes, covering with foil for the first 10 minutes to prevent over‑browning. A quick microwave burst (30‑45 seconds) works in a pinch, but the oven retains the flaky texture best.
Frequently Asked Questions
Can I make these sliders ahead of time?
What if I don’t have crescent roll dough?
What side dishes pair best with these sliders?
These Mini Cheeseburger Crescent Sliders deliver all the comfort of a classic cheeseburger wrapped in a buttery, flaky crescent, and they do it with minimal effort. By following the detailed steps, tips, and storage advice, you’ll achieve consistent, crowd‑pleasing results every time. Feel free to experiment with cheeses, toppings, or sauces to make the recipe truly yours. Serve them warm, enjoy the burst of flavor, and watch them disappear in minutes!
Mini Cheeseburger Crescent Sliders: A Delicious and Easy Recipe
Delicious Mini Cheeseburger Crescent Sliders: A Delicious and Easy Recipe
Ingredients
Main Ingredients
- 1 tube (8 oz) refrigerated crescent roll dough
- 12 oz ground beef (80/20)
- 6 slices sharp cheddar cheese, cut into small squares
- 12 small dill pickle chips
Sauce & Condiments
- 3 tablespoons mayonnaise
- 1 tablespoon ketchup
- 1 teaspoon Dijon mustard
- 1 teaspoon sweet pickle relish
Seasonings & Garnish
- 1/2 teaspoon garlic powder
- 1/2 teaspoon onion powder
- 1/2 teaspoon smoked paprika
- Salt and freshly ground black pepper, to taste
- 2 teaspoons chopped fresh chives (optional)
Instructions
Assembling the Sliders
- Unroll & Cut Dough. Open the crescent roll tube and separate the pre‑cut triangles. If the triangles are too large, trim them slightly so they form a neat pocket for the filling. Each triangle will become the outer shell of a slider.
- Layer the Fillings. Place a beef patty in the center of each triangle, then top with a square of cheddar cheese and a pickle chip. The cheese should sit directly on the meat so it melts into the patty during baking.
- Seal & Shape. Fold the edges of the dough over the filling, pressing gently to seal. The dough should wrap around the patty, leaving a small opening at the top for the sauce drizzle. Brush the exposed dough lightly with melted butter for extra golden color.
- Arrange on Baking Sheet. Place the assembled sliders on a parchment‑lined baking sheet, spacing them about 1 inch apart. This allows heat to circulate and ensures even puffing.
- Bake to Perfection. Preheat the oven to 375°F (190°C). Bake the sliders for 12‑15 minutes, or until the dough is puffed, lightly browned, and the cheese is fully melted. Watch the edges; they should be crisp but not burnt.
Similar Recipes
 Appetizers
Crispy Lemon Pepper Chicken Tenders
Delicious Crispy Lemon Pepper Chicken Tenders
 Appetizers
cozy roasted carrot and parsnip medley with garlic and herbs
Roast carrots & parsnips with garlic & herbs for a cozy, flavorful main. Try this easy…
 Appetizers
Crunchy Sugar Snap Pea Salad: A Vibrant Touch of Health on Your Plate
Delicious Crunchy Sugar Snap Pea Salad: A Vibrant Touch of Health on Your Plate
 Appetizers
Zesty Watermelon Feta Salad with Mint: A Refreshing Summer Delight
Delicious Zesty Watermelon Feta Salad with Mint: A Refreshing Summer Delight
 Appetizers
Avocado Bliss Pasta Salad: The Ultimate Recipe Guide
Delicious Avocado Bliss Pasta Salad: The Ultimate Recipe Guide
 Appetizers
Crispy Smoked Sausage Bites with a Honey Glaze
Learn how to make delicious Crispy Smoked Sausage Bites with a Honey Glaze. Easy recipe with…
 Appetizers
Chickpea Bean Salad
Learn how to make delicious Chickpea Bean Salad. Easy recipe with step-by-step instructions.
 Appetizers
Mini Chicken Pesto Crescent Pinwheels
Delicious Mini Chicken Pesto Crescent Pinwheels

Lucy
I cook these recipes at home before they ever land here — simple ingredients, clear steps.