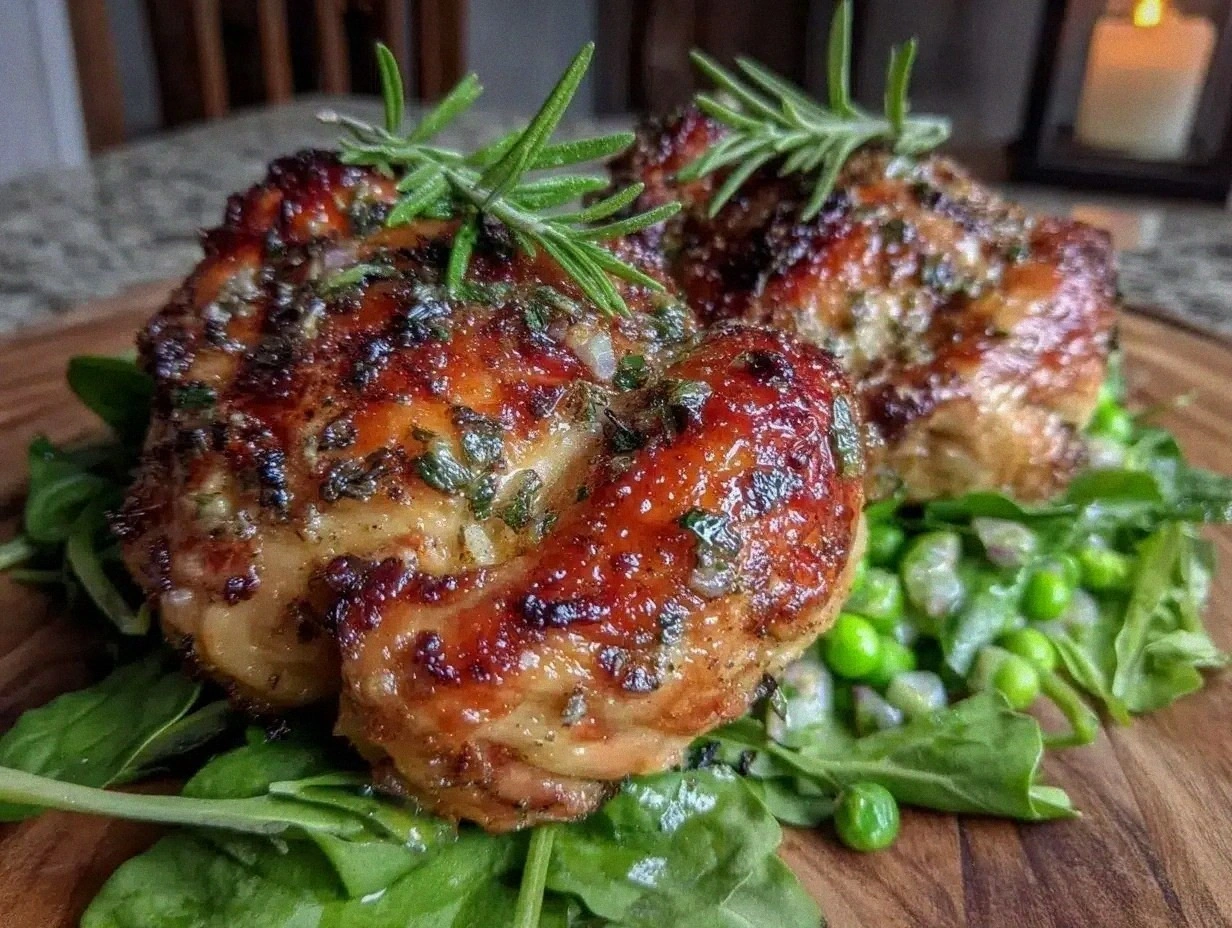
Crispy Herbed Butter Roasted Cornish Hens Recipe with Easy Spring Greens
 Save
Save
The first time I tried to roast a Cornish hen for a spring dinner, I was standing in the kitchen with the windows open, the scent of budding lilacs drifting in, and a tiny bird perched on a cutting board like a promise of something special. As the oven door clicked shut, a cloud of fragrant steam rose, carrying notes of melted butter, fresh rosemary, and a whisper of lemon zest that seemed to dance with the early morning light. I could hear the faint crackle of the skin beginning to crisp, a sound that always makes my heart skip a beat because I know that golden, crackly exterior is the gateway to juicy, tender meat inside. Have you ever wondered why a simple herb butter can turn a modest bird into a show‑stopping centerpiece?
What makes this recipe a true kitchen triumph is the marriage of technique and simplicity. The butter isn’t just a fat; it’s a vehicle for herbs, garlic, and lemon zest that penetrates the meat, creating layers of flavor that build with each bite. The spring greens on the side bring a bright, peppery contrast, and the quick sauté in a splash of broth keeps them tender yet vibrant, like a fresh garden tossed onto the plate. The best part? You don’t need a professional oven or a sous‑vide machine—just a good oven, a couple of small birds, and a handful of pantry staples. But wait until you see the secret trick in step four that guarantees the skin stays perfectly crisp without drying the meat.
Imagine gathering your family around a rustic wooden table, the hens glistening with buttery herbs, the greens shimmering with a light lemon‑olive oil glaze, and the conversation flowing as freely as the aromas filling the room. This dish feels like a celebration of spring itself—bright, lively, and comforting all at once. It’s the kind of meal that makes you pause, take a deep breath, and feel grateful for the simple joys of cooking. And because it’s quick enough for a weeknight yet impressive enough for a special occasion, it’s destined to become a staple in your culinary repertoire.
Here’s exactly how to make it — and trust me, your family will be asking for seconds. Grab your apron, preheat that oven, and let’s dive into a recipe that blends buttery richness with fresh herb aromatics, all while keeping the greens delightfully crisp. The journey from raw ingredients to a plated masterpiece is just a few steps away, and the payoff? A dish that sings with flavor and looks stunning on any table.
🌟 Why This Recipe Works
- Flavor Depth: The combination of butter, fresh thyme, rosemary, and lemon zest creates a layered taste profile that deepens as the hen cooks, ensuring every bite is packed with aromatic goodness.
- Texture Contrast: The high‑heat roasting crisps the skin to a satisfying crackle while the meat stays juicy, offering a delightful contrast that keeps you reaching for more.
- Ease of Execution: With just a few steps and minimal equipment, this recipe is approachable for home cooks of any skill level, yet it delivers restaurant‑quality results.
- Time Efficiency: From prep to plate in under an hour, it fits perfectly into a busy weekday schedule without sacrificing flavor or presentation.
- Versatility: The herb butter can be swapped with other herbs, and the spring greens can be replaced with seasonal vegetables, making the dish adaptable year‑round.
- Nutrition Boost: The lean protein of the Cornish hen pairs beautifully with the antioxidant‑rich greens, delivering a balanced meal that feels indulgent yet wholesome.
- Ingredient Quality: Using high‑quality butter and fresh herbs elevates the dish, proving that simple ingredients, when treated with care, can shine.
- Crowd‑Pleaser Factor: The golden, glossy finish looks impressive, while the familiar flavors keep even picky eaters satisfied.
🥗 Ingredients Breakdown
The Foundation: Cornish Hens & Butter
Cornish hens are the perfect size for a personal portion, offering a delicate flavor that’s richer than chicken but still tender. When you choose hens that are about 1 to 1½ pounds each, you ensure they’ll cook evenly and stay juicy. If you can, look for birds that are still a little pink in the meat—that’s a sign of freshness. The butter, preferably a high‑fat variety like Kerrygold, provides a luxurious mouthfeel and acts as a carrier for the herbs and aromatics, ensuring every bite is infused with flavor.
Aromatics & Spices: Herbs, Garlic, & Lemon Zest
Fresh thyme and rosemary are the stars here; their piney, slightly citrusy notes cut through the richness of the butter, while the garlic adds a savory backbone that awakens the palate. If fresh herbs aren’t on hand, dried versions work, but use about a third of the amount to avoid overpowering the dish. The lemon zest is the secret weapon that brings brightness, balancing the buttery depth and preventing the dish from feeling heavy. Trust me, that subtle citrus spark is what makes the flavor sing.
The Secret Weapons: Salt, Pepper, & Olive Oil
Kosher salt is preferred because its larger crystals give you better control over seasoning, allowing you to season the skin evenly without over‑salting. Freshly ground black pepper adds a gentle heat that complements the herbs without stealing the spotlight. A drizzle of olive oil on the greens not only prevents them from sticking but also adds a fruity note that pairs beautifully with the lemon juice added at the end. The combination of these basics creates a harmonious backdrop for the star ingredients.
Finishing Touches: Spring Greens & Broth
The spring greens mix—baby spinach, arugula, and tender kale—brings texture, color, and a peppery bite that lifts the entire plate. The ¼ cup of broth (or water) used for sautéing creates a gentle steam that wilts the greens without overcooking them, preserving their bright green hue and nutrients. A splash of fresh lemon juice at the end ties the greens back to the lemon zest on the hens, creating a cohesive flavor loop. Optional shallots add a sweet undertone, but even without them the greens stay lively and fresh.
With your ingredients prepped and ready, let's get cooking. Here’s where the fun really begins, and I’ll walk you through each step so you can feel confident and excited as the aromas start to fill your kitchen.
🍳 Step-by-Step Instructions
🔐 Expert Tips for Perfect Results
The Taste Test Trick
Before you slide the hens into the oven, taste a tiny spoonful of your herb butter. If it feels a bit bland, add a pinch more salt or a dash more lemon zest. This quick test ensures the flavor is balanced, because once the butter melts onto the bird, you can’t adjust it. Trust me, a well‑seasoned butter makes all the difference in the final bite.
Why Resting Time Matters More Than You Think
Resting isn’t just a suggestion; it’s a science. As the birds rest, the muscle fibers relax and the juices settle back into the meat, preventing them from spilling out when you cut. I once cut into a freshly roasted hen and watched the juices run like a mini waterfall—delicious but messy. A ten‑minute rest transforms that mess into a moist, fork‑tender experience.
The Seasoning Secret Pros Won’t Tell You
Professional chefs often finish a roasted bird with a light sprinkle of flaky sea salt just before serving. The tiny crystals add a burst of crunch and a pop of salty brightness that contrasts beautifully with the buttery skin. It’s a tiny step that elevates the dish from home‑cooked to restaurant‑worthy.
Pan‑Roast Finish for Extra Depth
If you have a few extra minutes, after the hens are done, place the roasting pan (without the rack) on the stovetop over medium‑high heat. Add a splash of white wine or chicken broth, scrape up the browned bits, and let it reduce for a minute. Drizzle this quick pan sauce over the carved meat for an extra layer of umami and a glossy finish. I love doing this when I want to impress guests with a “sauce” that didn’t require a separate pot.
The Green‑Greens Timing Hack
For the greens, don’t over‑cook. They should stay a vivid green and retain a slight bite. If you prefer them softer, add a minute or two of extra steaming, but remember that the lemon juice added at the end will brighten them again. This balance keeps the greens from becoming mushy, preserving both texture and nutrition.
The Best Way to Store Leftovers
If you have leftovers, store the meat and greens separately in airtight containers. Reheat the meat gently in a low oven (300°F) with a splash of broth to keep it moist, and quickly sauté the greens with a bit more olive oil. This method prevents the skin from getting rubbery and the greens from turning limp.
🌈 Delicious Variations to Try
One of my favorite things about this recipe is how versatile it is. Here are some twists I’ve tried and loved:
Maple‑Glazed Autumn Hens
Swap the lemon zest for 2 tablespoons of pure maple syrup and add a pinch of ground cinnamon to the butter mixture. The sweet‑spicy glaze creates a beautiful caramelization that pairs wonderfully with roasted root vegetables. This variation shines in the cooler months when you crave a touch of warmth.
Garlic‑Chili Kick
Add 1 teaspoon of smoked paprika and a pinch of red pepper flakes to the herb butter for a subtle heat. The smoky undertones deepen the flavor, while the chili gives a pleasant bite that awakens the palate. Serve with a cooling cucumber‑yogurt sauce to balance the heat.
Mediterranean Olive & Sun‑Dried Tomato
Stir chopped Kalamata olives and sun‑dried tomatoes into the butter before spreading it on the hens. The briny olives and sweet tomatoes add a Mediterranean flair, and they mingle beautifully with the fresh herbs. Pair with a side of couscous or quinoa for a complete meal.
Herb‑Infused Butter with Sage & Butter
Replace rosemary with fresh sage and add a tablespoon of browned butter for a nutty, earthy profile. Sage’s slightly peppery flavor complements the richness of the browned butter, creating a dish that feels both rustic and refined. This version is perfect for a cozy weekend dinner.
Asian‑Inspired Soy‑Ginger Glaze
Mix 2 tablespoons of soy sauce, 1 tablespoon of grated ginger, and a splash of rice vinegar into the butter. The umami‑rich glaze gives the hens an exotic twist, and a sprinkle of toasted sesame seeds adds crunch. Serve with steamed bok choy or snap peas for a balanced Asian-inspired plate.
📦 Storage & Reheating Tips
Refrigerator Storage
Place the carved meat in an airtight container and store the greens in a separate sealed bag or container. In the fridge, the cooked hens stay fresh for up to 3 days. Keep the skin exposed to a paper towel to absorb any excess moisture, which helps preserve crispness.
Freezing Instructions
If you want to freeze, wrap each whole hen tightly in plastic wrap, then place them in a freezer‑safe bag. They’ll keep for up to 2 months. For the greens, blanch them briefly in boiling water, shock in ice water, then freeze in a zip‑top bag. This method locks in color and texture for later use.
Reheating Methods
To reheat, preheat the oven to 300°F (150°C). Place the hens on a baking sheet, add a splash of broth or water, and cover loosely with foil for the first 10 minutes. Then remove the foil and continue heating until the skin is crisp again, about 10‑15 minutes total. For the greens, a quick sauté with a drizzle of olive oil restores their freshness in just a couple of minutes.
❓ Frequently Asked Questions
Can I use regular chicken instead of Cornish hens?
What if I don’t have fresh herbs?
How do I know when the hens are perfectly cooked?
Can I add stuffing inside the hens?
What’s the best way to keep the skin crispy after reheating?
Can I make the greens ahead of time?
Is it okay to use unsalted butter?
What side dishes pair best with this meal?
Remove the hens from the oven and let them rest on a cutting board for 10 minutes. Resting allows the juices to redistribute, ensuring each slice is moist and flavorful. While they rest, the skin will firm up a bit more, giving you that perfect snap when you cut into it. Use this time to plate the greens, arranging them in a colorful bed that will showcase the golden birds.
Carve each hen by removing the legs first, then the breast, and slice the meat against the grain. Arrange the pieces over the sautéed greens, drizzle any pan juices over the top, and finish with an extra zest of lemon if you love a bright finish. The result is a plate that looks like spring on a platter—golden, green, and bursting with aroma. And the result? Your family will be reaching for seconds, and you’ll feel like a culinary hero.
Similar Recipes
 Dinner
healthy slow cooker turkey stew with winter squash and spinach
Set-and-forget wholesome turkey stew with squash & spinach. Dump, simmer, savor—get the cozy low-cal recipe now!
 Dinner
Tropical Bliss Coconut Curry Lentil Stew: A Culinary Journey
Delicious Tropical Bliss Coconut Curry Lentil Stew: A Culinary Journey
 Dinner
Crusty Delight: Baked Salmon with Mayo and Parmesan Herb Crust
Delicious Crusty Delight: Baked Salmon with Mayo and Parmesan Herb Crust
 Dinner
Creamy Dreamy Spinach Cheese Shells: A Delicious Comfort Food Recipe
Delicious Creamy Dreamy Spinach Cheese Shells: A Delicious Comfort Food Recipe
 Dinner
Quick Shrimp Tacos with Avocado Crema
Delicious Quick Shrimp Tacos with Avocado Crema
 Dinner
Savory Butternut Squash & Sage Pasta Recipe
Delicious Savory Butternut Squash & Sage Pasta Recipe
 Dinner
Honey Chipotle Garlic Sliders Recipe
Spicy honey‑glazed beef sliders with melty cheese and crisp pickles deliver bold flavor in every bite.
 Dinner
Tropical Bliss Coconut Curry Chickpea Stew: A Flavorful Journey
Delicious Tropical Bliss Coconut Curry Chickpea Stew: A Flavorful Journey

Lucy
I cook these recipes at home before they ever land here — simple ingredients, clear steps.