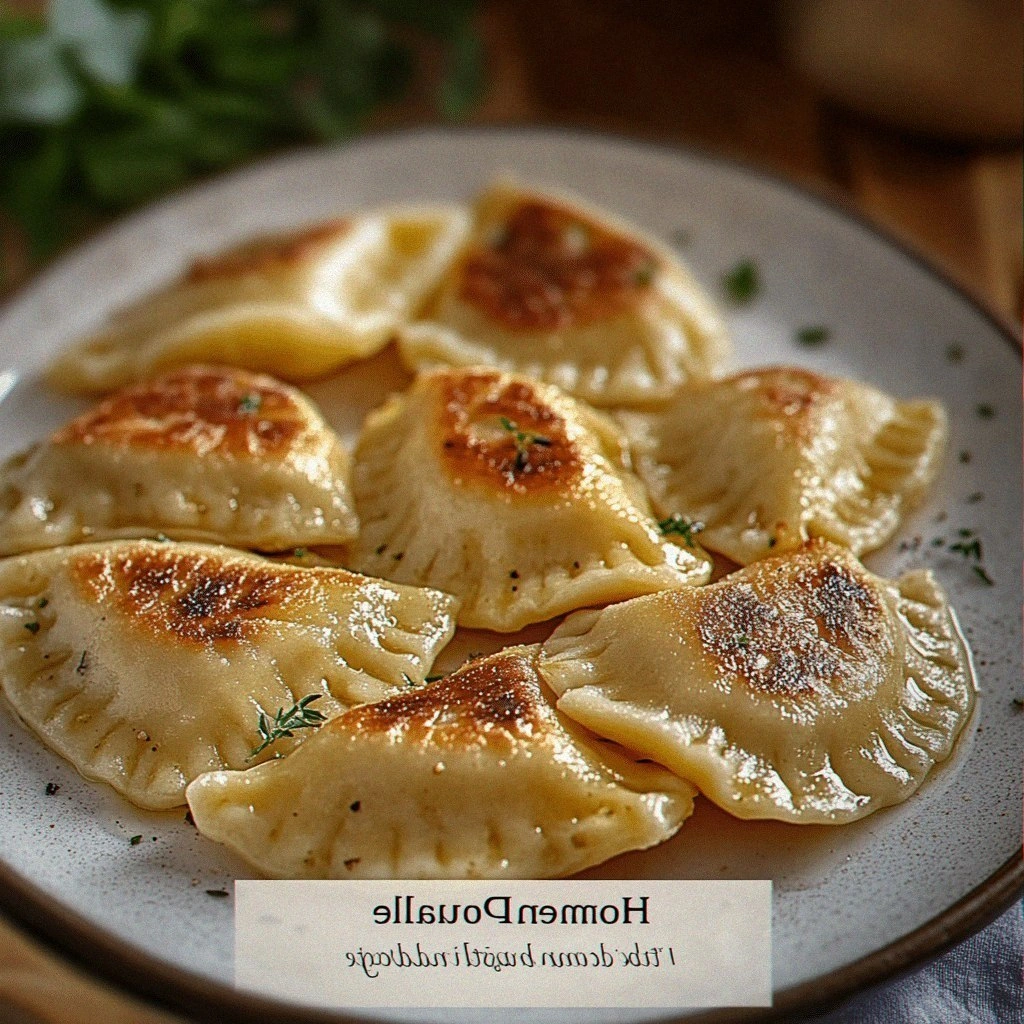
Delicious Homemade Pierogi
 Save
Save
It was a crisp autumn afternoon, the kind where the wind carries the scent of fallen leaves and the kitchen feels like the coziest refuge in the house. I was standing at my old wooden countertop, rolling out dough that smelled faintly of butter and nostalgia, while my niece tugged at my apron, eyes wide with anticipation. The moment I lifted the lid off the pot of simmering potatoes, a cloud of warm, earthy steam rose, wrapping the room in a hug that reminded me of family gatherings around a wooden table, where stories and laughter were as plentiful as the food. That day, I decided to bring my grandmother’s secret pierogi recipe to life, but with a few modern twists that make it both authentic and irresistibly comforting.
What makes pierogi so magical is the delicate balance between a tender, slightly chewy dough and a filling that bursts with flavor the instant you bite into it. Imagine the first bite: a golden‑brown crust giving way to creamy mashed potatoes, tangy ricotta, and a hint of sharp cheddar, all punctuated by the sweet caramelization of caramelized onions. The aroma alone—rich, buttery, with a whisper of earthiness—will have everyone at the table leaning in, asking for the recipe before the plate even hits the table. As we dive into the process, you’ll discover why this version stands out from the rest, and why it’s become a staple in my kitchen during holidays and ordinary Tuesdays alike.
But wait—there’s a secret technique I learned from my abuela that transforms the dough from ordinary to melt‑in‑your‑mouth, and you’ll find it in step four. Have you ever wondered why restaurant pierogi sometimes feel a bit too dense or fall apart when you pick them up? The answer lies in a simple, yet often overlooked, balance of moisture and resting time, a detail I’ll reveal just before we roll the dough. Trust me, once you master that, you’ll never look at store‑bought dumplings the same way again.
Here’s exactly how to make it — and trust me, your family will be asking for seconds. From selecting the perfect flour to mastering the art of folding each pocket, we’ll walk through every nuance together. So grab a bowl, preheat your spirit of adventure, and let’s embark on a culinary journey that will fill your home with love, laughter, and the unforgettable taste of homemade pierogi.
🌟 Why This Recipe Works
- Flavor Depth: By combining mashed potatoes with ricotta and a splash of sharp cheddar, each bite delivers layers of creamy, tangy, and slightly salty notes that dance on the palate. The cheese melts into the potatoes, creating a silky texture that’s both comforting and sophisticated.
- Texture Harmony: The dough is crafted with just enough butter and water to achieve a tender yet sturdy wrapper, ensuring it holds the filling without cracking. When boiled, the pierogi develop a delicate, slightly chewy bite that’s perfect for a quick sauté afterward.
- Ease of Preparation: Although it sounds elaborate, the steps are broken down into manageable tasks, and most ingredients are pantry staples. You’ll find that with a little practice, the process becomes a soothing ritual rather than a chore.
- Time Efficiency: The total time is under an hour, with a brief resting period that dramatically improves the dough’s elasticity. This makes the recipe ideal for weekend cooking or a special weekday dinner when you have a bit more time to spare.
- Versatility: The base filling can be swapped out for meat, mushroom, or even sweet fruit versions, allowing you to tailor the dish to any occasion or dietary preference. It’s a canvas for creativity while staying rooted in tradition.
- Nutrition Balance: Using a blend of potatoes, ricotta, and a modest amount of butter provides a good mix of carbs, protein, and healthy fats, making the pierogi satisfying without being overly heavy.
- Crowd‑Pleasing Factor: Whether you’re serving a family of picky eaters or impressing guests at a dinner party, these pierogi are universally adored. The familiar flavors combined with a handcrafted touch make them a standout star on any table.
🥗 Ingredients Breakdown
The Foundation: Dough Essentials
The dough’s backbone is 3 cups of all‑purpose flour, chosen for its balanced protein content that creates a tender yet sturdy wrapper. If you have access to “00” flour, you can substitute half of the all‑purpose flour for an even silkier texture, but be mindful that you may need a splash more water. The 1 large egg adds richness and helps bind the dough, giving it a subtle golden hue that turns beautiful when sautéed. ½ cup water is added gradually; the exact amount can vary depending on humidity, so add it a tablespoon at a time until the dough feels smooth and slightly tacky. Finally, 2 tablespoons unsalted butter melt into the mixture, contributing flavor and a tender crumb, while ½ teaspoon salt enhances the overall taste profile.
Aromatics & Spices: Building the Filling Base
The heart of the filling starts with 2 cups mashed potatoes, preferably made from Yukon Golds for their buttery flavor and creamy texture. When you mash them while still warm, they blend seamlessly with the dairy components. 1 cup ricotta cheese or farmer’s cheese introduces a light, slightly tangy creaminess that balances the earthiness of the potatoes. If you can’t find farmer’s cheese, a well‑drained ricotta works beautifully. Adding ½ cup shredded cheddar cheese brings a sharp, melty bite that makes each pierogi irresistibly cheesy. A small onion, finely diced and sautéed until caramelized, adds a sweet, caramel note that deepens the overall flavor. Season with salt and pepper to taste to bring everything together.
The Secret Weapons: Enhancing Flavor Layers
A tablespoon of butter melted into the filling right before sealing the pierogi adds a glossy finish and a buttery aroma that elevates the entire dish. For those who crave a meatier version, ½ pound ground beef seasoned with a second small onion, salt, and pepper creates a hearty alternative that pairs wonderfully with the potato‑cheese blend. This dual‑onion approach ensures each component has its own aromatic depth without overwhelming the palate.
Finishing Touches: Cooking and Serving
When it comes time to cook, you’ll need 4 cups water for boiling, seasoned with a pinch of salt to keep the pierogi from sticking together. After boiling, a quick sauté in 2 tablespoons butter gives them a crisp, golden exterior. Serve with a dollop of sour cream or applesauce for a tangy or sweet contrast—both traditional accompaniments that round out the dish beautifully.
With your ingredients prepped and ready, let's get cooking. Here's where the fun really begins, and you’ll see why each step matters for that perfect bite.
🍳 Step-by-Step Instructions
🔐 Expert Tips for Perfect Results
The Taste Test Trick
Before sealing all of your pierogi, cook a single test piece. This miniature experiment lets you gauge the seasoning balance, dough thickness, and cooking time. If the test pierogi feels bland, add a pinch more salt or a dash of pepper to the filling. If the dough tears, let it rest a few minutes longer. Trust me on this one: a quick taste test saves you from a batch of under‑seasoned dumplings.
Why Resting Time Matters More Than You Think
Allowing the dough to rest isn’t just a suggestion—it’s a game‑changer. The 30‑minute chill lets the gluten relax, which means you can roll the dough thinner without it springing back. I once tried to skip this step, and the dough snapped like a brittle cookie, ruining the shape of the pierogi. The next time, give it that half‑hour break and thank yourself when the dough glides effortlessly under your rolling pin.
The Seasoning Secret Pros Won’t Tell You
A pinch of nutmeg in the potato filling adds a warm, subtle depth that many chefs keep under wraps. It’s a whisper of spice that doesn’t overpower but enhances the earthy potatoes and cheese. I discovered this secret while browsing an old Polish cookbook, and it instantly elevated my pierogi to a new level of comfort food sophistication.
Butter‑Basting for the Perfect Crunch
When sautéing the boiled pierogi, use a mixture of butter and a splash of oil. The oil raises the smoke point, preventing the butter from burning, while the butter contributes that unmistakable golden flavor. Toss the pierogi gently so each side gets an even coating; the result is a uniformly crisp crust that sings with each bite.
Freezing Without Losing Texture
If you want to make a big batch for future meals, freeze the uncooked, sealed pierogi on a parchment sheet before transferring them to a zip‑top bag. This flash‑freeze method prevents them from sticking together. When you’re ready to cook, you can drop them straight into boiling water—no thawing required. The texture remains as fluffy as the day you made them.
🌈 Delicious Variations to Try
One of my favorite things about this recipe is how versatile it is. Here are some twists I've tried and loved:
Mushroom‑And‑Caramelized Onion Delight
Swap the potato‑cheese base for a mixture of sautéed wild mushrooms, caramelized onions, and a splash of cream. The earthy mushrooms pair beautifully with the buttery dough, creating a rustic, forest‑inspired flavor that’s perfect for autumn evenings.
Sweet Apple‑Cinnamon Surprise
For a dessert version, fill the pierogi with cooked apples tossed in cinnamon, a pinch of brown sugar, and a dab of cream cheese. After boiling, lightly pan‑fry them and dust with powdered sugar. This sweet twist turns the classic dumpling into a comforting holiday treat.
Spinach‑And‑Feta Fusion
Combine wilted spinach, crumbled feta, and a hint of garlic for a Mediterranean spin. The salty feta balances the mild spinach, and the dough’s buttery notes bring everything together in a harmonious bite.
Spicy Sausage & Sauerkraut
Mix cooked, crumbled Polish sausage with tangy sauerkraut and a dash of caraway seeds. This hearty, slightly sour filling is perfect for a winter feast, especially when paired with a dollop of whole‑grain mustard.
Cheesy Bacon Bliss
Stir crispy bacon bits and shredded mozzarella into the classic potato‑cheese blend. The smoky bacon adds crunch, while the mozzarella creates a stretchy, gooey center that kids absolutely adore.
Herb‑Infused Ricotta & Lemon Zest
Add fresh herbs like basil, thyme, and a touch of lemon zest to the ricotta for a bright, summery filling. This version pairs wonderfully with a light butter‑herb sauce and a side of fresh salad.
📦 Storage & Reheating Tips
Refrigerator Storage
Cooked pierogi can be stored in an airtight container in the fridge for up to 3 days. Place a sheet of parchment paper between layers to prevent them from sticking together. When you’re ready to eat, simply reheat them in a skillet with a little butter until they’re warmed through and the edges regain their crispness.
Freezing Instructions
Uncooked pierogi freeze best when placed on a baking sheet lined with parchment paper, ensuring they don’t touch. After they’re solid (about 2 hours), transfer them to a zip‑top freezer bag, labeling with the date. They’ll keep for up to 2 months. To cook from frozen, add an extra minute to the boiling time; no need to thaw first.
Reheating Methods
The trick to reheating without drying out? A splash of water or broth in the pan, covered with a lid for a minute, creates steam that revives the softness. Then finish with a quick sauté in butter for that signature crunch. If you prefer the microwave, cover the pierogi with a damp paper towel and heat in 30‑second bursts, but the skillet method always yields the best texture.
❓ Frequently Asked Questions
Can I use gluten‑free flour for the dough?
What’s the difference between ricotta and farmer’s cheese?
Can I freeze the dough after it’s been mixed?
Why do my pierogi sometimes burst open while boiling?
Can I use a food processor to make the dough?
What’s the best way to shape pierogi without a cutter?
Should I add sugar to the dough?
Can I make the pierogi ahead of time and store them uncooked?
Heat a large skillet over medium heat and melt the remaining 2 tablespoons of butter. Once the butter sizzles and turns a light amber, add the boiled pierogi in a single layer. Cook for about 3‑4 minutes on each side, or until they develop a golden‑brown crust that crackles softly when you bite into them. The butter not only adds flavor but also creates that irresistible crispy exterior that contrasts beautifully with the soft interior.
Serve the pierogi hot, drizzled with a little extra melted butter if desired, and accompanied by a dollop of sour cream or a spoonful of applesauce. The cool cream cuts through the richness of the butter, while the sweet applesauce adds a surprising contrast that many families adore. For a festive touch, garnish with a sprinkle of fresh dill or a dusting of smoked paprika. Now, here’s where the magic truly happens—take a bite, close your eyes, and let the flavors transport you back to that cozy kitchen memory.
Similar Recipes
 Appetizers
Spicy Green Chili Chicken Toast Melts: Perfecting Your Recipe
Delicious Spicy Green Chili Chicken Toast Melts: Perfecting Your Recipe
 Appetizers
Crisp & Zesty Cucumber Tomato Avocado Salad
Delicious Crisp & Zesty Cucumber Tomato Avocado Salad
 Appetizers
Grilled Charcuterie Sandwich Melt
Delicious Grilled Charcuterie Sandwich Melt
 Appetizers
Grilled Corn on the Cob with Heavenly Garlic Parmesan Butter
Delicious Grilled Corn on the Cob with Heavenly Garlic Parmesan Butter
 Appetizers
Savory Herb-Infused Roasted Balsamic Vinaigrette
Delicious Savory Herb-Infused Roasted Balsamic Vinaigrette
 Appetizers
healthy slow cooker turkey and winter vegetable stew with root vegetables
Learn how to make delicious healthy slow cooker turkey and winter vegetable stew with root vegetables.…
 Appetizers
Baked Buffalo Cauliflower for NFL Playoff Vegetarian Appetizers
Learn how to make delicious Baked Buffalo Cauliflower for NFL Playoff Vegetarian Appetizers. Easy recipe with…
 Appetizers
Crispy BBQ Chicken Flatbread Recipe
Delicious Crispy BBQ Chicken Flatbread Recipe

Lucy
I cook these recipes at home before they ever land here — simple ingredients, clear steps.