Frosty Strawberry Banana Bliss Cups Recipe
 Save
Save
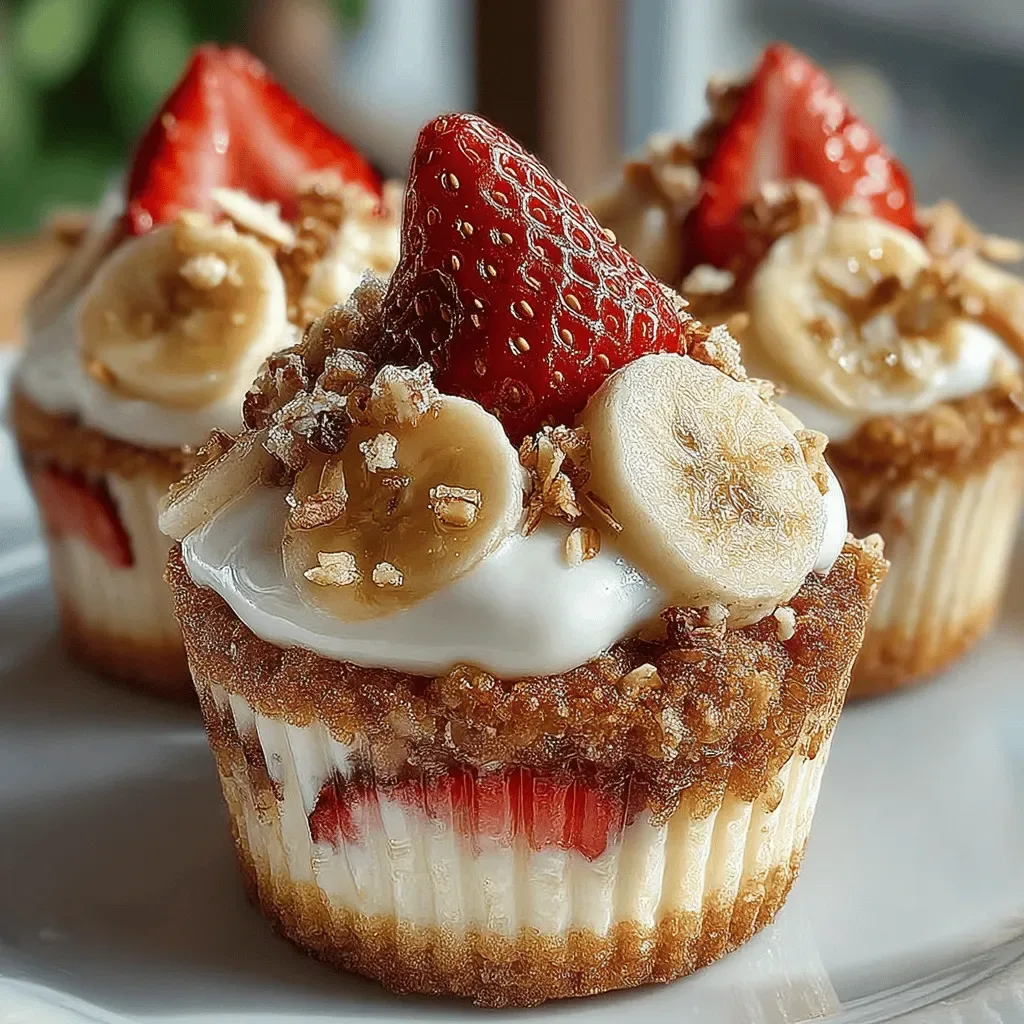
Imagine a dessert that feels like summer in a cup—cool, creamy, and bursting with fresh fruit. The Frosty Strawberry Banana Bliss Cups bring that feeling to life, delivering a light yet indulgent treat that’s perfect for any occasion.
What sets this recipe apart is the harmonious layering of a tangy strawberry‑banana puree, a velvety Greek‑yogurt mousse, and a crunchy granola‑chocolate topping. Each bite offers a different texture while the natural sweetness of the fruit keeps the dessert feeling wholesome.
This dish will delight kids who love bright colors, busy parents looking for a quick make‑ahead dessert, and anyone craving a guilt‑free sweet fix after dinner or as a midday pick‑me‑up.
The process is straightforward: blend the fruit, whisk together a light mousse, assemble the layers in individual cups, and freeze until set. Minimal equipment and a short prep time make it an effortless addition to your dessert repertoire.
Why You'll Love This Recipe
Bright & Fresh Flavors: The combination of ripe strawberries and sweet bananas creates a naturally sweet base that needs no added sugar, delivering a clean, fruit‑forward taste.
Quick Assembly: All components can be prepared in under 20 minutes, then simply layered and frozen—perfect for busy weeknights or last‑minute gatherings.
Eye‑Catching Presentation: Served in clear cups, the vibrant pink‑orange layers look as good as they taste, making them ideal for brunch tables or dessert buffets.
Nutritious Boost: Greek yogurt adds protein and probiotics, while the fruit supplies vitamins and fiber, turning a sweet treat into a balanced snack.
Tips & Tricks
Perfecting the Recipe
Use Ripe Fruit. Fully ripe strawberries and bananas yield the sweetest puree and prevent the need for extra sweeteners.
Freeze on a Flat Surface. Placing cups on a baking sheet ensures they stay level, giving an even thickness for each layer.
Flavor Enhancements
Add a pinch of sea salt to the yogurt mousse for a subtle flavor boost, or swirl in a teaspoon of almond butter for a nutty undertone. A few fresh mint leaves on top just before serving add a refreshing aroma that lifts the whole dessert.
Common Mistakes to Avoid
Avoid over‑blending the fruit; a smooth puree is ideal, but excessive blending can introduce too much air, leading to icy crystals. Also, do not skip the short chilling of the yogurt mousse—warm mousse can melt the fruit layer, causing the cups to become soggy.
Pro Tips
Pre‑portion Granola. Keep the crunchy topping separate until just before serving to preserve its texture.
Use a Small Ice Cream Scoop. This helps you achieve uniform layers quickly and looks professional.
Label the Freezer. Write the date on the cup lid; frozen desserts taste best within 3 days.
Serve with a Spoon. A sturdy dessert spoon prevents the cup from cracking and makes the experience more elegant.
Variations
Ingredient Swaps
Swap strawberries for raspberries or mango for an exotic twist. Replace banana with ripe peaches for a softer fruit profile. For a dairy‑free version, use coconut‑milk yogurt instead of Greek yogurt, and trade honey for agave nectar. Each swap maintains the dessert’s creamy‑frosty character while offering new flavor pathways.
Dietary Adjustments
To keep it gluten‑free, ensure the granola you choose is certified gluten‑free. For a low‑sugar version, reduce honey to 1 tablespoon or use a sugar‑free sweetener like erythritol. Vegans can replace Greek yogurt with soy or almond yogurt and use maple syrup as the sweetener.
Serving Suggestions
Pair the cups with a dollop of whipped coconut cream for extra richness, or sprinkle toasted coconut flakes on top for tropical flair. A side of fresh berries adds a burst of acidity that balances the creaminess. For brunch, serve alongside mini scones or a light avocado toast.
Storage Info
Leftover Storage
Allow the cups to reach room temperature, then seal each with its lid or wrap tightly in plastic wrap. Store in the refrigerator for up to 3 days for a softer texture, or keep frozen for up to 2 weeks if you prefer a firmer, ice‑cream‑like bite.
Reheating Instructions
These cups are best enjoyed cold, but if you want a softer, almost “soft‑serve” consistency, microwave a single cup for 10‑15 seconds, then stir gently. Alternatively, let the cup sit at room temperature for 5‑7 minutes before serving; this softens the edges without melting the core.
Frequently Asked Questions
Can I prepare these cups a day ahead?
What if I only have frozen strawberries?
Can I use a different sweetener?
What’s the best cup size to use?
This Frosty Strawberry Banana Bliss Cups recipe delivers a bright, creamy, and crunchy dessert that feels both indulgent and wholesome. By following the detailed steps, using fresh ingredients, and applying the pro tips, you’ll achieve a frozen treat that looks as impressive as it tastes. Feel free to experiment with fruit swaps or topping variations—making it your own is part of the fun. Enjoy every spoonful of summer in a cup!
Frosty Strawberry Banana Bliss Cups Recipe
Delicious Frosty Strawberry Banana Bliss Cups Recipe
Ingredients
Fruit Base
- 1 ½ cups fresh strawberries, hulled
- 1 cup ripe banana, sliced
- 1 tablespoon fresh lemon juice
Creamy Yogurt Layer
- 1 cup plain Greek yogurt (full‑fat)
- 2 tablespoons honey or maple syrup
- ½ teaspoon pure vanilla extract
Crunch Topping
- ¼ cup crunchy granola
- 2 tablespoons dark chocolate chips
Instructions
Making the Yogurt Mousse
- Combine Ingredients. In a medium bowl whisk together the Greek yogurt, honey (or maple syrup), and vanilla extract until the mixture is silky and slightly airy. This step incorporates a little air, giving the mousse a light texture that won’t become gummy after freezing.
- Chill Briefly. Cover the bowl with plastic wrap and place it in the refrigerator for 5‑10 minutes. A cool mousse spreads more evenly over the fruit layer and helps maintain a distinct separation between layers.
Assembling the Cups
- Layer Fruit. Spoon 2‑3 tablespoons of the strawberry‑banana puree into the bottom of each serving cup (6‑oz clear plastic or glass cups work best). Smooth the surface with the back of a spoon; the layer should be about ¼‑inch thick.
- Add Yogurt. Gently pipe or spoon an equal amount of the chilled yogurt mousse over the fruit puree, spreading it to the cup’s edges. The contrast of pink fruit and white mousse creates an appealing visual stripe.
- Top with Crunch. Sprinkle the granola and dark chocolate chips evenly over each cup. Press lightly so the topping adheres, but avoid compressing the granola too much; you want it to stay crisp after freezing.
- Seal & Freeze. Cover each cup with its lid or a piece of plastic wrap. Place the cups on a baking sheet and transfer to the freezer. Freeze for at least 2‑3 hours, or until the dessert is firm enough to eat with a spoon.
Similar Recipes
 Desserts
Pumpkin Fudge Swirl Cake Bars
Indulge in the perfect fall treat with our Pumpkin Fudge Swirl Cake Bars—rich pumpkin spice, creamy…
 Desserts
Cocoa Bliss: No-Bake Chocolate Oat Fudge Bars
Delicious Cocoa Bliss: No-Bake Chocolate Oat Fudge Bars
 Desserts
Chilly Pumpkin Delight Squares: A Festive Dessert to Savor
Delicious Chilly Pumpkin Delight Squares: A Festive Dessert to Savor
 Desserts
Delicious Strawberry Chia Pudding Pops
Delicious Delicious Strawberry Chia Pudding Pops
 Desserts
Frozen Blueberry Oatmeal Crumble Slices: A Delicious and Nutritious Treat
Delicious Frozen Blueberry Oatmeal Crumble Slices: A Delicious and Nutritious Treat
 Desserts
Pumpkin Pie Crumble Bars
Discover how to make buttery pumpkin pie crumble bars with a crisp topping – perfect for…
 Desserts
No‑Bake Chocolate Peanut Butter Cookies
Learn how to make delicious No‑Bake Chocolate Peanut Butter Cookies. Easy recipe with step-by-step instructions.
 Desserts
Velvety Vanilla Custard Tart: Crafting, Assembling, and Enjoying
Delicious Velvety Vanilla Custard Tart: Crafting, Assembling, and Enjoying

Lucy
I cook these recipes at home before they ever land here — simple ingredients, clear steps.