Fruity Chill Pops: The Ultimate Guide to Homemade Refreshment
 Save
Save
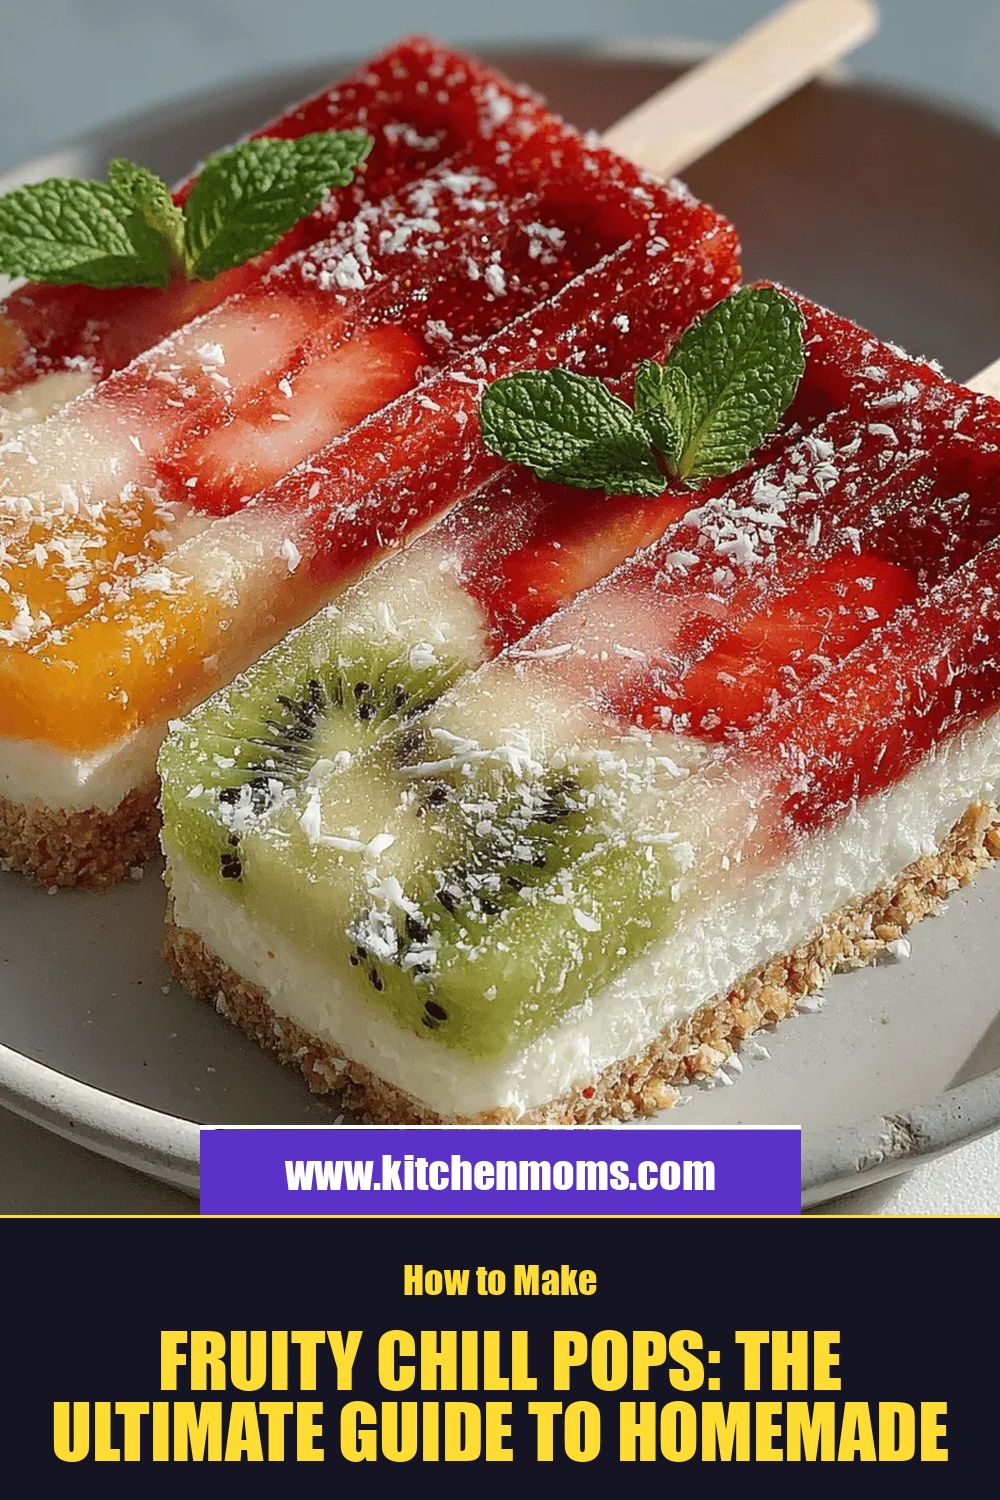
Imagine a bite-sized burst of sunshine on a lazy weekend morning – that’s the promise of Fruity Chill Pops. These refreshing, hand‑crafted popsicles turn ordinary fruit into a cool, palate‑pleasing treat that feels both indulgent and wholesome.
What sets this recipe apart is the balance of natural sweetness, bright acidity, and a silky texture achieved without any artificial additives. By using fresh‑pressed fruit purees and a touch of honey, each pop delivers pure fruit flavor that’s both vibrant and satisfying.
Perfect for families, brunch gatherings, or a sunny brunch‑by‑the‑pool, everyone from kids to adults will love the playful, melt‑in‑your‑mouth experience. Serve them alongside avocado toast, a light yogurt parfait, or simply on their own for a refreshing start to the day.
The process is straightforward: blend fruit, sweeten, pour into molds, and freeze. With a few simple steps and a little patience, you’ll have a tray of colorful, nutritious pops ready to delight.
Why You'll Love This Recipe
Fresh Fruit Focus: Using real fruit puree gives each pop an authentic, bright flavor that no store‑bought version can match, delivering vitamins and antioxidants in every bite.
Customizable Sweetness: Adjust honey, agave, or maple syrup to suit your palate, making the pops perfect for those who prefer less sugar or a deeper natural sweetness.
Eye‑Catching Presentation: The vivid colors of berries, mango, or kiwi turn any brunch table into a festive display, encouraging kids to eat more fruit without hesitation.
Healthy & Guilt‑Free: No dairy, no preservatives, and only natural ingredients mean you can indulge without the usual after‑taste of processed desserts.
Tips & Tricks
Perfecting the Recipe
Use Ripe Fruit. The sweeter and more fragrant the fruit, the less additional sweetener you’ll need, resulting in a cleaner flavor profile.
Strain for Ultra‑Smooth Pops. If you prefer a silkier texture, push the puree through a fine‑mesh sieve before adding liquid.
Freeze in Layers. For multi‑flavored pops, freeze one fruit layer first (about 30 minutes), then add a second layer of a contrasting color.
Flavor Enhancements
Add a splash of vanilla extract for a warm backdrop, or a pinch of grated ginger for a subtle zing. A drizzle of coconut cream before freezing creates a creamy swirl that feels indulgent without extra dairy.
Common Mistakes to Avoid
Avoid over‑filling the molds; expansion during freezing can cause cracks. Also, don’t skip the warm‑water tip when unmolding—cold molds make the pops stick and can lead to broken edges.
Pro Tips
Pre‑Chill Molds. Placing silicone molds in the freezer for 10 minutes before pouring helps the puree set faster and reduces air bubbles.
Use a Kitchen Scale. Measuring fruit by weight ensures consistent flavor and texture across batches.
Label Your Creations. Write the flavor and date on a small sticker; frozen treats lose potency after about three months.
Variations
Ingredient Swaps
Swap strawberries for raspberries, mango for pineapple, or blueberries for blackcurrants to explore new flavor palettes. Replace honey with maple syrup for a caramel note, or use stevia for a low‑calorie alternative without compromising sweetness.
Dietary Adjustments
For a vegan version, keep honey optional and use agave nectar or date syrup. To make it keto‑friendly, reduce fruit to low‑sugar berries and substitute honey with erythritol or monk fruit blend. All ingredients are naturally gluten‑free.
Serving Suggestions
Pair the pops with a light Greek yogurt parfait, a citrus‑infused water, or a sparkling mocktail for brunch. For a playful twist, drizzle a thin layer of dark chocolate over the frozen pops and refreeze for 10 minutes.
Storage Info
Leftover Storage
Keep any unused pops in their original silicone molds, cover tightly with plastic wrap, and store in the freezer. They’ll stay fresh for up to 3 months. For longer trips, transfer each pop into a zip‑top freezer bag, separating them with parchment paper to avoid sticking.
Reheating Instructions
Pops are meant to be enjoyed frozen, but if you prefer a softer texture, let them sit at room temperature for 5‑7 minutes before serving. This brief thaw brings out the fruit aromas without melting the entire pop.
Frequently Asked Questions
Can I make these pops ahead of time for a weekend brunch?
What if I don’t have a high‑speed blender?
How can I keep the pops from turning brown?
Fruity Chill Pops bring together the joy of fresh fruit, simple techniques, and a splash of creativity into a brunch‑worthy treat. By following the step‑by‑step guide, mastering the storage tips, and experimenting with the suggested variations, you’ll have a versatile, healthy dessert that brightens any morning. Feel free to mix flavors, add herbs, or swap sweeteners—make each batch uniquely yours. Enjoy the cool, refreshing bite of summer all year round!
Fruity Chill Pops: The Ultimate Guide to Homemade Refreshment
Delicious Fruity Chill Pops: The Ultimate Guide to Homemade Refreshment
Ingredients
Fruit Base
- 2 cups fresh strawberries, hulled
- 1 cup mango chunks (fresh or frozen)
- ½ cup blueberries
Sweetener & Flavor
- 2 tablespoons raw honey (or agave nectar)
- 1 tablespoon freshly squeezed lemon juice
Optional Add‑Ins
- 1 tablespoon finely chopped fresh mint
- 2 teaspoons chia seeds (for a subtle texture boost)
Molds & Extras
- 8 silicone pop‑sicle molds (or reusable plastic molds)
- Wooden sticks or reusable popsicle sticks
Instructions
Blending & Sweetening
- Combine fruit. Place the strawberries, mango, and blueberries into a high‑speed blender. Pulse until the mixture is uniformly smooth, stopping to scrape down the sides for even blending.
- Add liquid and sweetener. Pour in the coconut water, drizzle the honey, and add the lemon juice. Blend again for 15‑20 seconds. The lemon juice brightens the flavor and helps prevent oxidation, keeping the color vivid.
- Season to taste. Taste the puree; if you prefer a sweeter pop, add an extra half‑teaspoon of honey. If the mixture feels too thick, thin it with a tablespoon more coconut water.
- Incorporate optional add‑ins. Stir in fresh mint or chia seeds by hand. Mint adds a refreshing aroma, while chia seeds create a subtle crunch and boost nutrition.
Similar Recipes
 Desserts
Healthy Pumpkin Mousse
Learn how to make delicious Healthy Pumpkin Mousse. Easy recipe with step-by-step instructions.
 Desserts
Velvety Vanilla Bean Rice Pudding: A Comprehensive Guide
Delicious Velvety Vanilla Bean Rice Pudding: A Comprehensive Guide
 Desserts
Pistachio Vanilla Cupcakes
Learn how to make delicious Pistachio Vanilla Cupcakes. Easy recipe with step-by-step instructions.
 Desserts
Sweet Honey Apple Oat Bake: A Delicious and Nutritious Treat
Delicious Sweet Honey Apple Oat Bake: A Delicious and Nutritious Treat
 Desserts
Pumpkin Streusel Pound Cake
Discover the perfect fall treat with our Pumpkin Streusel Pound Cake—a moist, buttery cake topped with…
 Desserts
classic holiday sugar cookies with royal icing for christmas baking
Learn how to make delicious classic holiday sugar cookies with royal icing for christmas baking. Easy…
 Desserts
Frozen Yogurt Apple Cinnamon Swirl Discs
Delicious Frozen Yogurt Apple Cinnamon Swirl Discs
 Desserts
Crispy Pumpkin Oat Snack Clusters Recipe
Delicious Crispy Pumpkin Oat Snack Clusters Recipe

Lucy
I cook these recipes at home before they ever land here — simple ingredients, clear steps.