Indulge in Decadence: Chocolate Hazelnut Mousse Cups Recipe

WANT TO SAVE THIS RECIPE?

Introduction

When it comes to desserts, few can rival the allure of chocolate. It captivates the senses with its rich aroma, velvety texture, and deep, complex flavors that can evoke nostalgia and joy with every bite. Among the myriad of chocolate-based treats, the Chocolate Hazelnut Mousse Cups stand out as a luxurious indulgence that combines the finest elements of chocolate and nuts. This recipe invites you to experience a delightful harmony of flavors, where the richness of dark chocolate meets the creamy essence of hazelnuts, creating a dessert that feels both indulgent and sophisticated.

Chocolate hazelnut mousse cups are not just a feast for the palate; they are also a visual delight. Served in elegant cups, this dessert presents beautifully, making it ideal for dinner parties, special occasions, or any time you want to treat yourself. The mousse boasts a light, airy texture, thanks to the incorporation of whipped cream and egg whites, while the hazelnut spread adds an irresistible nuttiness that elevates this dessert to new heights. Each spoonful offers a perfect balance of richness, creaminess, and the subtle crunch of toasted hazelnuts, making it a memorable treat for any chocolate lover.

In this article, we will explore the ingredients that make up this decadent dessert, delve into the step-by-step instructions for creating the perfect mousse cups, and share tips to ensure your dessert turns out flawlessly every time.

Understanding the Ingredients

To craft the perfect chocolate hazelnut mousse cups, it’s essential to understand the role of each ingredient and how they contribute to the overall flavor and texture of the dessert. Here’s a breakdown of the main components:

Dark Chocolate

Dark chocolate is the star of this recipe, providing the rich, intense flavor that defines the mousse. When selecting dark chocolate, aim for a cocoa percentage of at least 70%. This high cocoa content ensures a deep chocolate flavor while maintaining a balance of sweetness that complements the other ingredients. The quality of the chocolate is crucial, as it directly influences the taste of the final product. Look for brands that use high-quality cocoa beans and minimal additives for the best results.

Unsalted Butter

Unsalted butter plays a vital role in achieving a smooth and luxurious texture in the mousse. It helps to emulsify the mixture, creating a creamy base that enhances the mouthfeel of the dessert. By using unsalted butter, you have complete control over the saltiness of the mousse, allowing the chocolate and hazelnut flavors to shine without distraction.

Eggs

Eggs are essential in mousse-making, serving two crucial functions: the yolks add richness and help bind the ingredients, while the whites are whipped to create a light and airy texture. The yolks contribute to the overall creaminess of the mousse, while the whipped egg whites provide the lift needed to achieve that signature mousse consistency. It’s important to separate the yolks and whites carefully to avoid any contamination, as even a small amount of yolk can prevent the whites from whipping properly.

Granulated Sugar

Granulated sugar is used to balance the bitterness of the dark chocolate and enhance the overall flavor of the mousse. The sugar dissolves during the mixing process and contributes to the smoothness of the final product. Adjusting the amount of sugar based on your taste preference is possible, but be mindful that reducing sugar too much can impact the texture and sweetness of the mousse.

Heavy Cream

Heavy cream is crucial for achieving the airy, light texture characteristic of mousse. When whipped, heavy cream incorporates air, creating fluffy peaks that lend volume to the dessert. The cream also adds a rich, creamy mouthfeel that perfectly complements the chocolate and hazelnut flavors. For the best results, ensure your heavy cream is chilled before whipping, as cold cream whips more effectively.

Hazelnut Spread

Hazelnut spread is the secret ingredient that infuses the mousse with a luscious hazelnut flavor. This sweet, creamy spread adds depth to the chocolate, creating a harmonious blend of flavors that will leave your taste buds wanting more. Opt for a high-quality hazelnut spread that contains real hazelnuts and minimal additives for the best flavor.

Sea Salt

A pinch of sea salt enhances the overall flavor of the mousse, drawing out the chocolate and hazelnut notes. It’s essential to use a good-quality sea salt, as it can elevate the taste of sweet dishes by providing a subtle contrast to the sweetness. Be careful not to overdo it; a little goes a long way.

Optional Garnishes

To elevate your chocolate hazelnut mousse cups, consider adding some optional garnishes. Fresh berries, such as raspberries or strawberries, offer a bright contrast in color and flavor, while toasted hazelnuts add a delightful crunch and enhance the nuttiness of the dessert. These garnishes not only enhance the visual appeal but also provide additional texture and flavor complexity.

Step-by-Step Instructions

Now that you have a clear understanding of the ingredients, let’s dive into the step-by-step process of making these decadent chocolate hazelnut mousse cups. Follow these instructions carefully to ensure your mousse turns out light, airy, and incredibly delicious.

Melting Chocolate

The first step in creating your chocolate hazelnut mousse is to melt the dark chocolate. This can be done using either a double boiler or a microwave. If using a double boiler, fill the bottom pot with water and bring it to a gentle simmer. Place the chopped dark chocolate in the top pot, ensuring it doesn’t touch the water, and stir until melted and smooth.

If you prefer the microwave method, place the chopped chocolate in a microwave-safe bowl and heat it in 20-second intervals, stirring between each interval until fully melted. Be cautious not to overheat the chocolate, as it can seize and become grainy. Once melted, set the chocolate aside to cool slightly before proceeding to the next steps.

Whisking Eggs

While the chocolate is cooling, it’s time to prepare the eggs. In a large mixing bowl, separate the egg yolks from the whites, placing the yolks in one bowl and the whites in another. Using a whisk or an electric mixer, beat the egg yolks until they are pale and slightly thickened. This process helps to incorporate air into the yolks, which will contribute to the overall texture of the mousse.

Once the yolks are whisked, gradually add granulated sugar while continuing to whisk. The mixture should become glossy and slightly lighter in color. This step is crucial for achieving the desired sweetness and texture.

Combining Mixtures

Now, it’s time to combine the melted chocolate with the egg yolk mixture. Pour the cooled chocolate into the egg yolk mixture, and gently fold them together using a spatula. Be careful not to deflate the mixture; use a gentle folding motion until the two are fully incorporated. The goal is to maintain as much air as possible while blending the ingredients.

Beating Egg Whites

Next, it’s time to whip the egg whites. Using a clean, dry bowl and mixer, beat the egg whites on medium speed until they reach soft peaks. This means that when you lift the whisk, the peaks should gently flop over rather than stand straight up. Soft peaks are essential for the mousse’s texture, as they allow for the right amount of air to be incorporated without being too stiff.

Once the egg whites reach the soft peak stage, it’s time to incorporate them into the chocolate mixture. Begin by adding a small spoonful of the whipped egg whites to the chocolate mixture, gently folding it in to lighten the base. Once incorporated, gradually add the rest of the egg whites in two or three additions, folding gently to maintain the airiness of the mousse.

Final Steps

After the egg whites are fully incorporated, add the heavy cream and hazelnut spread to the mixture. Again, use a gentle folding motion to ensure everything is well combined without deflating the mousse. Finally, sprinkle in a pinch of sea salt to enhance the overall flavor.

Now, your chocolate hazelnut mousse is ready to be spooned into serving cups. Carefully spoon the mousse into individual cups or glasses, filling them about three-quarters full to allow space for garnishing. Once filled, refrigerate the mousse for at least 4 hours, or until set.

As your mousse chills, it will become firmer and develop a rich, decadent texture that is simply irresistible.

Stay tuned for the next part of this article, where we will explore some tips for achieving the best results with your chocolate hazelnut mousse cups, as well as answer some common questions that may arise during the preparation process. Enjoy the anticipation of indulging in this delightful dessert!
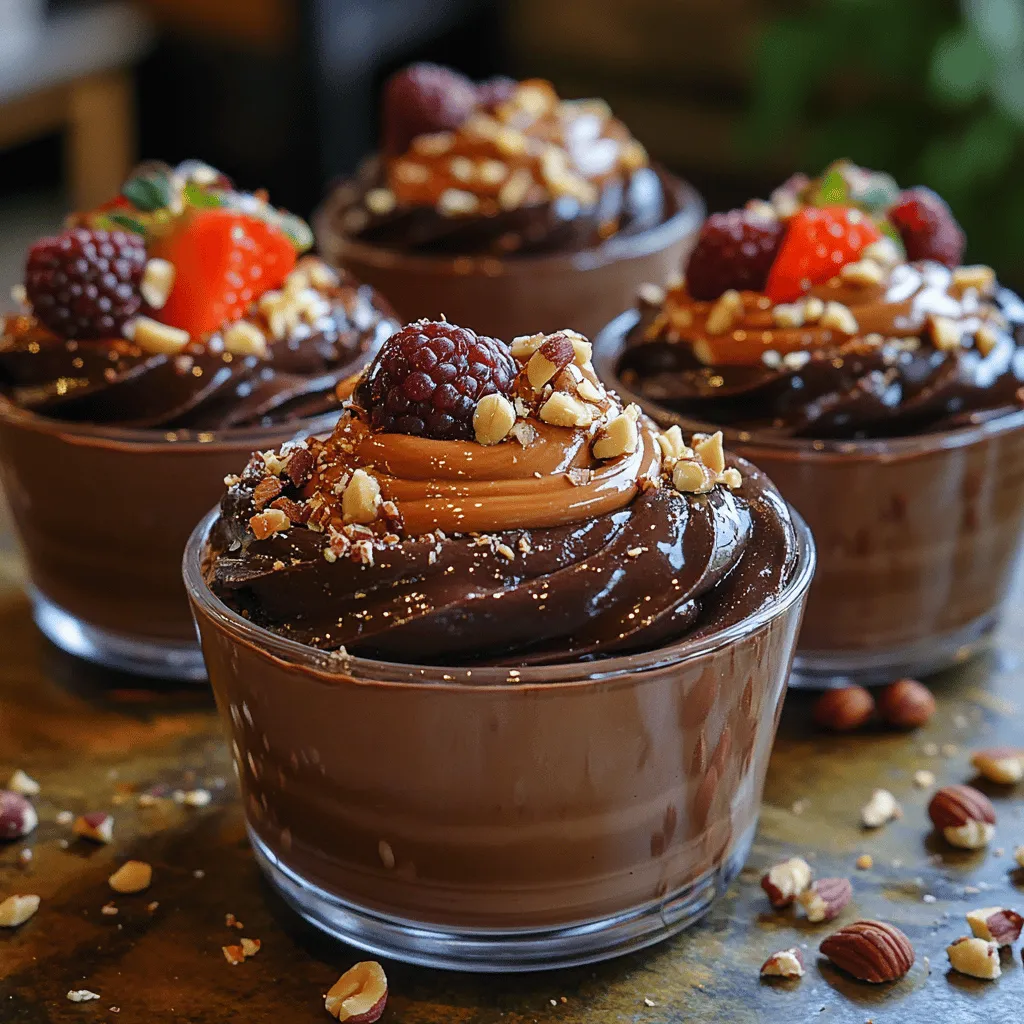
When it comes to desserts, few can rival the allure of chocolate. It captivates the senses with its rich aroma, velvety texture, and deep, complex flavors that can evoke nostalgia and joy with every bite. Among the myriad of chocolate-based treats, the <strong>Chocolate Hazelnut Mousse Cups</strong> stand out as a luxurious indulgence that combines the finest elements of chocolate and nuts. This recipe invites you to experience a delightful harmony of flavors, where the richness of dark chocolate meets the creamy essence of hazelnuts, creating a dessert that feels both indulgent and sophisticated.” /></p>
</p>
<h3>Whipping Cream: Achieving the Perfect Soft Peak Stage for Mousse</h3>
</p>
<p>The key to a successful chocolate hazelnut mousse lies in the whipped cream. Achieving the perfect soft peak stage is crucial for the desired texture. Start with cold heavy cream; the colder the cream, the better it will whip. Use a chilled mixing bowl and beaters to enhance the whipping process. Begin mixing at low speed to break up the cream, gradually increasing the speed as it thickens.</p>
</p>
<p>As the cream begins to thicken, watch closely for the soft peak stage, characterized by peaks that gently fold over upon themselves when the beaters are lifted. This stage is crucial as it provides enough structure to the mousse while still allowing for the incorporation of air, resulting in a light and fluffy dessert. If the cream is whipped too far, it may turn grainy, which can negatively affect the final texture of your mousse.</p>
</p>
<h3>Folding Ingredients: Techniques to Maintain a Light and Airy Texture</h3>
</p>
<p>Once your whipped cream is ready, the next step is to fold it into the chocolate mixture. This process is delicate and requires a gentle hand to maintain the airiness of the whipped cream. To fold effectively, use a silicone spatula or a large wooden spoon. Start by adding a dollop of whipped cream to the chocolate mixture, stirring it in to lighten the mixture. This initial addition helps to temper the chocolate, making it easier to incorporate the rest without deflating the air.</p>
</p>
<p>Next, add the remaining whipped cream in two or three additions. Use a gentle folding motion—scoop from the bottom of the bowl and lift it over the top, rotating the bowl as you go. Avoid vigorous mixing; instead, aim for a gentle motion that keeps as much air in the mixture as possible. This technique is what creates the light, airy texture characteristic of a perfect mousse.</p>
</p>
<h3>Adding Hazelnut Spread: Creating a Visually Appealing Swirl Effect</h3>
</p>
<p>To elevate your mousse both in flavor and presentation, incorporating hazelnut spread is a must. After folding in the whipped cream, take a few spoonfuls of hazelnut spread and dollop it on top of the mousse mixture. Using a skewer or the back of a spoon, gently swirl the hazelnut spread into the mousse. Be careful not to overmix; you want distinct ribbons of hazelnut spread throughout the chocolate mousse, creating a beautiful marbled effect. This not only adds visual appeal but also enhances the taste with delightful pockets of rich hazelnut flavor throughout the dessert.</p>
</p>
<h3>Chilling the Mousse: Importance of Setting Time for Flavor Development</h3>
</p>
<p>Once your mousse is prepared and beautifully swirled, it’s time to chill it. Transferring the mousse into individual serving cups or a large bowl, cover it with plastic wrap, and refrigerate for at least four hours, although overnight is ideal. Chilling allows the mousse to set properly, ensuring a creamy texture and rich flavors meld together.</p>
</p>
<p>The importance of this step cannot be overstated; it is during this time that the chocolate firms up, the hazelnut flavors intensify, and the overall experience of the mousse is enhanced. Patience is key—resist the temptation to dig in too early, as the final product is well worth the wait.</p>
</p>
<h3>Garnishing: Suggestions for Enhancing Presentation and Taste</h3>
</p>
<p>Garnishing your decadent chocolate hazelnut mousse cups can elevate their visual appeal and add complementary flavors. After chilling, top each mousse cup with a generous dollop of freshly whipped cream. You can also sprinkle finely chopped hazelnuts for a delightful crunch. For an extra touch of elegance, consider drizzling melted chocolate or a thin layer of hazelnut spread over the whipped cream.</p>
</p>
<p>Fresh berries, such as raspberries or strawberries, add a pop of color and a tart contrast to the sweetness of the chocolate mousse. Edible flowers or a dusting of cocoa powder can also add an artistic touch, making your dessert not only delicious but also stunning to look at.</p>
</p>
<h3>The Science Behind Chocolate Mousse</h3>
</p>
<p>Understanding the science of chocolate mousse can deepen your appreciation for this dessert. The light texture of mousse comes from the incorporation of air, achieved through the whipping of cream and folding techniques. When you whip the cream, you are incorporating tiny air bubbles into the liquid, which expands during the folding process and contributes to the final airy structure.</p>
</p>
<p>The emulsification process is also crucial. Combining fats from the chocolate and cream with liquids creates a stable mixture. The cocoa butter in the chocolate must blend well with the cream, which is primarily water. Proper temperature control is vital here; melted chocolate should be slightly cooled before combining with other ingredients to prevent the cream from melting back down.</p>
</p>
<p>Temperature affects the mixtures significantly. Warm chocolate combined with cool cream creates a smooth and silky mousse, while too much heat can cause the cream to separate. It’s essential to allow the chocolate to cool slightly after melting to ensure a perfect blend when mixing.</p>
</p>
<h3>Serving Suggestions</h3>
</p>
<p>Chocolate hazelnut mousse cups are versatile and suitable for various occasions. They make for an impressive dessert at dinner parties, special celebrations, or even as an indulgent treat for a cozy night in. Their elegant presentation and rich flavor profile make them a standout choice for any gathering.</p>
</p>
<p>When it comes to beverage pairings, consider serving your mousse with a glass of dessert wine, such as Port or a sweet Riesling, which can beautifully complement the richness of the chocolate. Coffee lovers can enjoy their mousse with a robust espresso or a creamy cappuccino, enhancing the overall experience. For a non-alcoholic option, a rich hot chocolate can create a delightful chocolate overload.</p>
</p>
<h3>Nutritional Insights</h3>
</p>
<p>As with any indulgent dessert, moderation is key when enjoying chocolate hazelnut mousse cups. While they are rich and decadent, they can be part of a balanced diet. Each serving provides a delightful combination of flavors and textures, with the main ingredients contributing to its nutritional content.</p>
</p>
<p>The mousse contains heavy cream, which adds a source of fat and calories, but also provides calcium and vitamin D. Dark chocolate, rich in antioxidants, can offer some health benefits if consumed in moderation. The hazelnut spread typically contains healthy fats from nuts, contributing to heart health.</p>
</p>
<p>While the calorie count may vary based on portion sizes and specific ingredients used, being mindful of serving sizes can allow you to indulge without overdoing it. Enjoying these mousse cups as an occasional treat can enhance your dessert experience while keeping nutritional balance in mind.</p>
</p>
<h3>Conclusion</h3>
</p>
<p>Decadent chocolate hazelnut mousse cups are not just a delicious dessert; they are an experience that combines the rich flavors of chocolate and hazelnut with a light, airy texture. The process of crafting these mousse cups, from whipping cream to the delicate folding technique, is a rewarding endeavor that can elevate any dessert table.</p>
</p>
<p>Embracing the art of dessert making allows you to explore flavors, textures, and presentation, bringing joy not only to yourself but also to those around you. So gather your ingredients, follow the steps outlined, and indulge in the delight of creating this luxurious treat. Whether for a special occasion or a personal indulgence, these mousse cups are sure to satisfy even the most discerning chocolate lovers.</p>
</div>

When it comes to desserts, few can rival the allure of chocolate. It captivates the senses with its rich aroma, velvety texture, and deep, complex flavors that can evoke nostalgia and joy with every bite. Among the myriad of chocolate-based treats, the Chocolate Hazelnut Mousse Cups stand out as a luxurious indulgence that combines the finest elements of chocolate and nuts. This recipe invites you to experience a delightful harmony of flavors, where the richness of dark chocolate meets the creamy essence of hazelnuts, creating a dessert that feels both indulgent and sophisticated.

Chocolate Hazelnut Mousse Cups

Discover the joy of creating Chocolate Hazelnut Mousse Cups, a decadent dessert that blends rich dark chocolate with creamy hazelnuts. This luxurious treat offers a light, airy texture made possible by whipped cream and egg whites. Perfect for special occasions or as a personal indulgence, these elegant cups are a feast for the eyes and the palate. With easy-to-follow instructions, you'll learn how to make this delightful mousse and impress your guests with minimal effort. Dive into a world of chocolatey bliss and elevate your dessert experience!

Ingredients
  

1 cup dark chocolate (70% cocoa or higher), chopped

1/4 cup unsalted butter

3 large eggs, separated

1/3 cup granulated sugar

1 teaspoon vanilla extract

1/4 teaspoon sea salt

1 cup heavy cream

1/2 cup hazelnut spread (like Nutella)

1/2 cup chopped hazelnuts (toasted, for garnish)

Fresh berries (for garnish, optional)

Instructions
 

Melt the Chocolate: In a heatproof bowl, combine the chopped dark chocolate and unsalted butter. Place it over a saucepan of simmering water (double boiler method) and stir until melted and smooth. Remove from heat and let cool slightly.

    Whisk Eggs: In a separate bowl, whisk the egg yolks with half of the granulated sugar (about 2 tablespoons) and vanilla extract until pale and creamy.

      Combine Mixtures: Stir the melted chocolate mixture into the egg yolk mixture until fully incorporated.

        Beat Egg Whites: In another clean bowl, using a mixer, beat the egg whites with the sea salt until soft peaks form. Gradually add the remaining granulated sugar, continuing to beat until the mixture holds stiff peaks.

          Whip Cream: In a separate bowl, whip the heavy cream until it reaches soft peaks.

            Fold Ingredients Together: Gently fold the whipped cream and then the beaten egg whites into the chocolate mixture. Be careful to maintain the airy texture.

              Add Hazelnut Spread: Finally, fold in the hazelnut spread until just combined, ensuring a swirled effect rather than fully mixing it in.

                Chill the Mousse: Portion the mousse into individual dessert cups or glasses. Cover and refrigerate for at least 2 hours or until set.

                  Garnish and Serve: Before serving, top each mousse cup with toasted hazelnuts and fresh berries if desired. Enjoy the rich, creamy texture of your chocolate hazelnut mousse cups!

                    Prep Time: 20 min | Total Time: 2 hrs 20 min | Servings: 6

                      WANT TO SAVE THIS RECIPE?

                      Leave a Comment

                      Recipe Rating