Introduction
Cookies have long held an esteemed place in the hearts of dessert lovers, transcending generations and cultures. From classic chocolate chip to sophisticated macarons, these delightful treats can be found in homes, bakeries, and coffee shops alike. Among the myriad of cookie variations, one that stands out for its unique blend of flavors and textures is the Peanut Butter Cup Explosion Cookie. This indulgent creation is not just another cookie; it is a celebration of sweet and salty goodness that brings together the creamy richness of peanut butter with the satisfying crunch of chocolate.
What sets the Peanut Butter Cup Explosion Cookies apart is their harmonious balance of flavors. Each bite bursts with the sweetness of chocolate, the savory depth of peanut butter, and a hint of salt that ties everything together. This cookie is perfect for various occasions, whether you’re looking for a simple snack to enjoy with your afternoon coffee or a show-stopping dessert to impress guests at a festive gathering. With their irresistible flavor and delightful texture, these cookies are sure to become a favorite in your home.
Understanding the Ingredients
Before diving into the baking process, it’s essential to understand the key ingredients that make these Peanut Butter Cup Explosion Cookies so special. Each component plays a vital role in achieving the perfect cookie, contributing to its flavor, texture, and overall appeal.
Creamy Peanut Butter
At the heart of this recipe lies creamy peanut butter, which not only adds a luscious, nutty flavor but also contributes to the cookie’s chewy texture. The fat content in peanut butter lends moisture, ensuring that your cookies remain soft and tender even after baking. When selecting peanut butter, opt for a high-quality brand that doesn’t contain added sugars or hydrogenated oils for the best results.
Unsalted Butter
Unsalted butter is another crucial ingredient in this recipe. It provides a creamy richness and helps to create a tender crumb. Using unsalted butter allows you to control the saltiness of your cookies, ensuring a well-balanced flavor. For optimal blending, make sure your butter is at room temperature before incorporating it into the dough.
Sugars (Brown and Granulated)
The combination of brown and granulated sugars is what gives these cookies their delightful sweetness and texture. Granulated sugar helps the cookies spread while baking, creating a nice, flat shape. On the other hand, brown sugar, with its molasses content, adds moisture and a rich, caramel-like flavor, resulting in a softer cookie. This blend of sugars is critical for achieving the perfect balance of sweetness and chewiness.
Egg
The egg serves as a binder in this recipe, helping to hold all the ingredients together. It adds structure to the cookies, ensuring they maintain their shape during baking. Additionally, the egg contributes moisture, enhancing the overall texture of the finished product. For best results, use large eggs, and make sure they are at room temperature.
Vanilla Extract
Vanilla extract is a flavor enhancer that elevates the overall taste of the cookies. Its warm, sweet aroma complements the peanut butter and chocolate, adding depth to each bite. Always opt for pure vanilla extract for the most authentic flavor; imitation vanilla may not provide the same richness.
Baking Soda
Baking soda acts as a leavening agent, helping the cookies rise and achieve a light, airy texture. When combined with the acidic components of brown sugar and peanut butter, baking soda releases carbon dioxide, which creates tiny air pockets in the dough. This results in a delightful chewiness and prevents the cookies from becoming overly dense.
All-Purpose Flour
All-purpose flour is the foundation of any cookie recipe, providing structure and stability. It contains the necessary proteins that form gluten when mixed with wet ingredients, giving the cookies their shape. For the best results, measure the flour correctly—spoon it into the measuring cup and level it off with a knife, avoiding packing it down.
Semi-Sweet Chocolate Chips and Mini Peanut Butter Cups
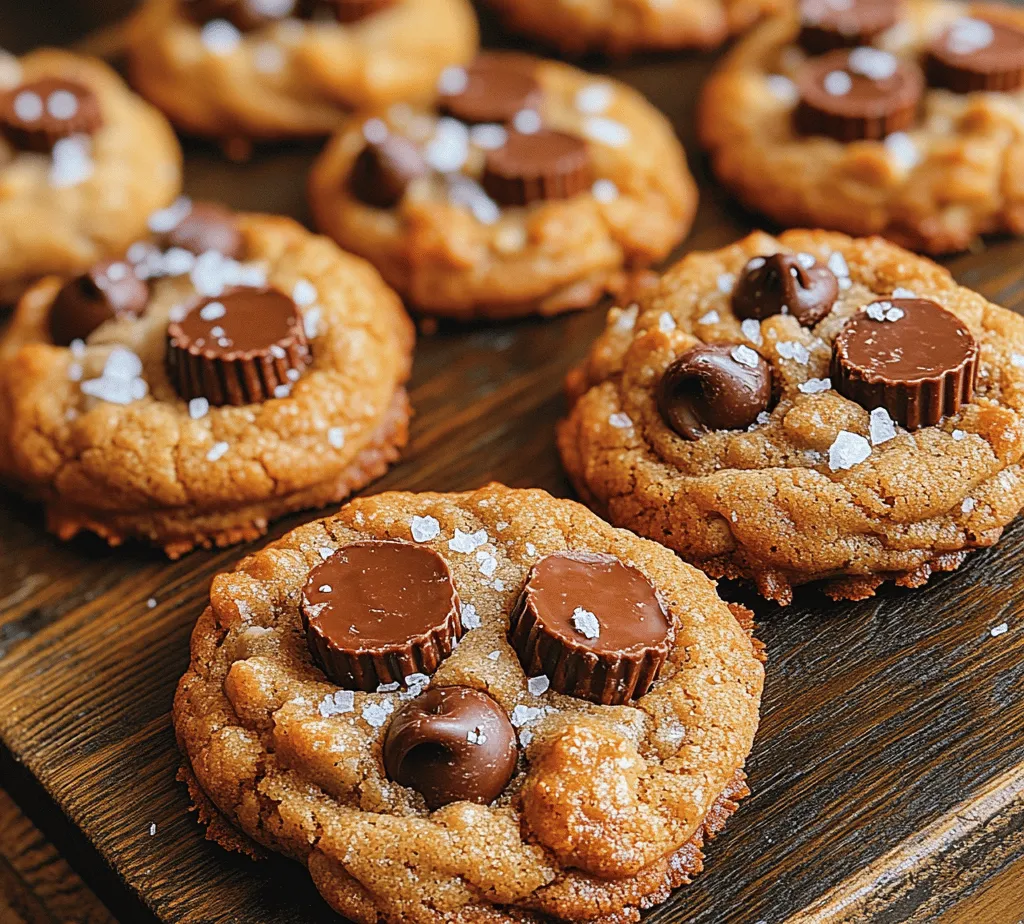
The star ingredients of the Peanut Butter Cup Explosion Cookies are undoubtedly the semi-sweet chocolate chips and mini peanut butter cups. These additions not only provide an explosion of flavor but also create a delightful contrast in texture. The chocolate chips add rich, melty pockets of chocolate, while the mini peanut butter cups offer an extra burst of creamy peanut butter in every bite. Together, they transform these cookies from delicious to extraordinary.
Sea Salt
Finally, a sprinkle of sea salt serves as the finishing touch that enhances all the flavors in the cookies. It balances the sweetness and brings out the richness of the peanut butter and chocolate. A little salt goes a long way in elevating the overall flavor profile of your cookies, making them truly irresistible.
Step-by-Step Instructions for Peanut Butter Cup Explosion Cookies
Now that you have a solid understanding of the ingredients, it’s time to roll up your sleeves and start baking! Follow these detailed steps to create the perfect Peanut Butter Cup Explosion Cookies.
Prepping Your Kitchen
Before you begin baking, it’s essential to set the stage for a successful cookie-making experience. Start by gathering all your ingredients and necessary tools, including mixing bowls, measuring cups and spoons, a baking sheet lined with parchment paper, and a spatula for mixing. Prepping your kitchen in advance will streamline the process and ensure you don’t forget any ingredients.
Preheating the Oven
Preheat your oven to 350°F (175°C). This step is critical for ensuring even baking and achieving the perfect texture. An adequately preheated oven allows the cookies to rise properly and develop a golden-brown color. While your oven is heating up, you can prepare the cookie dough.
Step 1: Creaming Butter and Peanut Butter
In a mixing bowl, combine the room-temperature unsalted butter and creamy peanut butter. Using a hand mixer or stand mixer, beat the two together on medium speed until the mixture is light and fluffy, usually about 2-3 minutes. This process incorporates air into the mixture, which is essential for achieving a light texture in your cookies. Scrape down the sides of the bowl as needed to ensure everything is well combined.
Step 2: Combining Sugars
Once the butter and peanut butter are creamed together, it’s time to add the sugars. Gradually mix in the granulated sugar and brown sugar until fully incorporated. Continue to beat the mixture for an additional 1-2 minutes. The sugars will dissolve slightly, creating a smooth and fluffy texture. This step is vital for achieving the desired sweetness and ensuring the cookies have a nice, chewy bite.
Step 3: Adding Egg and Vanilla
Next, add the large egg and pure vanilla extract to the mixing bowl. Beat the mixture on medium speed until the egg and vanilla are fully integrated. This will help create an even distribution of flavors and ensure the dough remains cohesive. The mixture should become smooth and glossy, with no visible streaks of egg remaining.
By following these initial steps, you’re well on your way to creating a batch of Peanut Butter Cup Explosion Cookies that will impress everyone. The combination of creamy peanut butter, rich chocolate, and a hint of salt sets the stage for a uniquely indulgent treat that is perfect for any occasion. Stay tuned for the next part of this recipe, where we’ll dive into the remaining steps to complete these delicious cookies.
Step 4: Mixing Dry Ingredients
Mixing dry ingredients properly is crucial for achieving the desired texture in your Peanut Butter Cup Explosion Cookies. Begin by whisking together the flour, baking soda, and a pinch of salt in a medium bowl. This process is not just about combining; it helps to aerate the flour and evenly distribute the leavening agent (baking soda), which ensures that your cookies rise uniformly. A well-mixed dry base creates the perfect foundation for the rich flavors and textures of the cookie.
When integrating the dry ingredients into the wet ingredients later, do so in increments. This gradual approach not only prevents clumping but also helps maintain the integrity of the mix, leading to a chewy, satisfying cookie.
Step 5: Folding in Chocolate Chips
Once your dry ingredients are ready, it’s time to fold in the chocolate chips. This step is essential for embedding those delightful chocolate morsels throughout the cookie dough. Use a spatula or wooden spoon to gently incorporate the chocolate chips into the mixture. The key here is to avoid overmixing; this ensures that your cookies remain soft and chewy rather than tough.
Folding rather than stirring helps to maintain the structure of the dough, allowing the ingredients to combine without developing too much gluten. Aim for just enough mixing so that the chocolate chips are evenly distributed, creating a delicious chocolate explosion in every bite.
Step 6: Forming Cookie Balls
Now it’s time to form the cookie balls. Use a cookie scoop or your hands to portion out the dough, aiming for about 1.5 to 2 tablespoons per ball. This size will yield cookies that are satisfying without being overly large.
When placing the cookie balls on your baking sheet, make sure to leave enough space between them—about 2 inches apart. This spacing is crucial as it allows the cookies to spread evenly while baking, ensuring that they don’t merge into one giant cookie.
Step 7: Adding Peanut Butter Cups
For the pièce de résistance, it’s time to add the mini peanut butter cups. After placing the cookie balls on the baking sheet, gently press one or two peanut butter cups into the center of each ball. This strategic placement not only enhances the gooey center but also creates a tantalizing surprise when you take a bite. The heat of the cookies will slightly melt the peanut butter cups as they bake, contributing to the rich, creamy texture that is the hallmark of these cookies.
Step 8: Baking the Cookies
Preheat your oven to 350°F (175°C) and check that your cookie sheets are lined with parchment paper for easy removal. Place the baking sheets in the oven and bake for 10-12 minutes. Watch closely towards the end of the baking time; the cookies are ready when the edges start to turn golden brown while the centers still look slightly underbaked.
This slight underbaking is intentional; the cookies will continue to cook on the baking sheet once removed from the oven, resulting in the perfect soft and chewy texture. For an even better result, consider rotating the baking sheets halfway through the baking time to ensure even heat distribution.
Step 9: Final Touch of Sea Salt
Once your cookies are out of the oven, sprinkle a light dusting of sea salt on top while they’re still warm. This final touch is not just for aesthetics; the addition of sea salt beautifully contrasts the sweetness of the peanut butter and chocolate. This balance enhances the overall flavor profile, making each bite a delightful experience of sweet and salty.
Cooling Process
After sprinkling the sea salt, let the cookies cool on the baking sheet for about 5 minutes before transferring them to a wire rack. This cooling period allows the cookies to set without becoming too hard. Cooling also plays a significant role in developing flavors; as they cool, the cookies become chewier and the flavors meld together beautifully.
Flavor Profile and Texture
Upon biting into a Peanut Butter Cup Explosion Cookie, you’ll experience a symphony of flavors. The sweetness of the peanut butter melds with the rich, velvety chocolate, creating a luscious experience. The salty finish from the sea salt elevates the taste, ensuring that the cookies are not overwhelmingly sweet.
In terms of texture, expect a delightful contrast: soft, chewy centers with slightly crisp edges. The addition of the peanut butter cups creates a unique surprise element in each bite, as the melted chocolate and peanut butter provide a creamy, indulgent burst that perfectly complements the cookie dough.
Serving Suggestions and Pairings
These cookies can be enjoyed in various ways. Serve them alone for a simple yet satisfying treat, or pair them with a glass of cold milk for a classic combination. They also work wonderfully on a dessert platter alongside brownies, bars, or other cookies, making them ideal for gatherings or parties.
For beverages, consider serving these cookies with coffee for a delightful contrast of flavors, or hot chocolate for an indulgent treat. The rich profile of the cookies pairs wonderfully with the warmth of these drinks.
If you’re feeling adventurous, try variations of this recipe. Use different types of chocolate—dark, white, or even flavored chocolate—to see how each alters the flavor profile. Incorporating chopped nuts, like pecans or walnuts, can add another layer of texture and flavor, making each cookie unique.
Storage and Shelf Life
To keep your Peanut Butter Cup Explosion Cookies fresh, store them in an airtight container at room temperature. They should remain delicious for up to a week. If you want to extend their shelf life, consider freezing the cookies. Place them in a single layer in a freezer-safe bag or container, separating layers with parchment paper to prevent sticking. They can be frozen for up to three months.
When you’re ready to enjoy a cookie, simply remove it from the freezer and let it thaw at room temperature. For an optimal experience, you can reheat the cookies in the oven at 350°F (175°C) for 5-10 minutes, allowing them to regain their soft and chewy texture.
Conclusion
Peanut Butter Cup Explosion Cookies are a must-try recipe for anyone who enjoys the delightful combination of peanut butter and chocolate. With their soft, chewy interiors and slightly crisp edges, these cookies offer a satisfying treat that is sure to please friends and family alike.
Baking these cookies is not just about following a recipe; it’s about enjoying the process of creating something delicious and sharing it with loved ones. So gather your ingredients, put on your apron, and get ready to experiment with this recipe. Whether you stick to the classic version or customize it to your liking, these cookies are bound to bring joy and sweetness into your kitchen.