Irresistible Homemade Granola Bars: Easy & Delicious Recipe
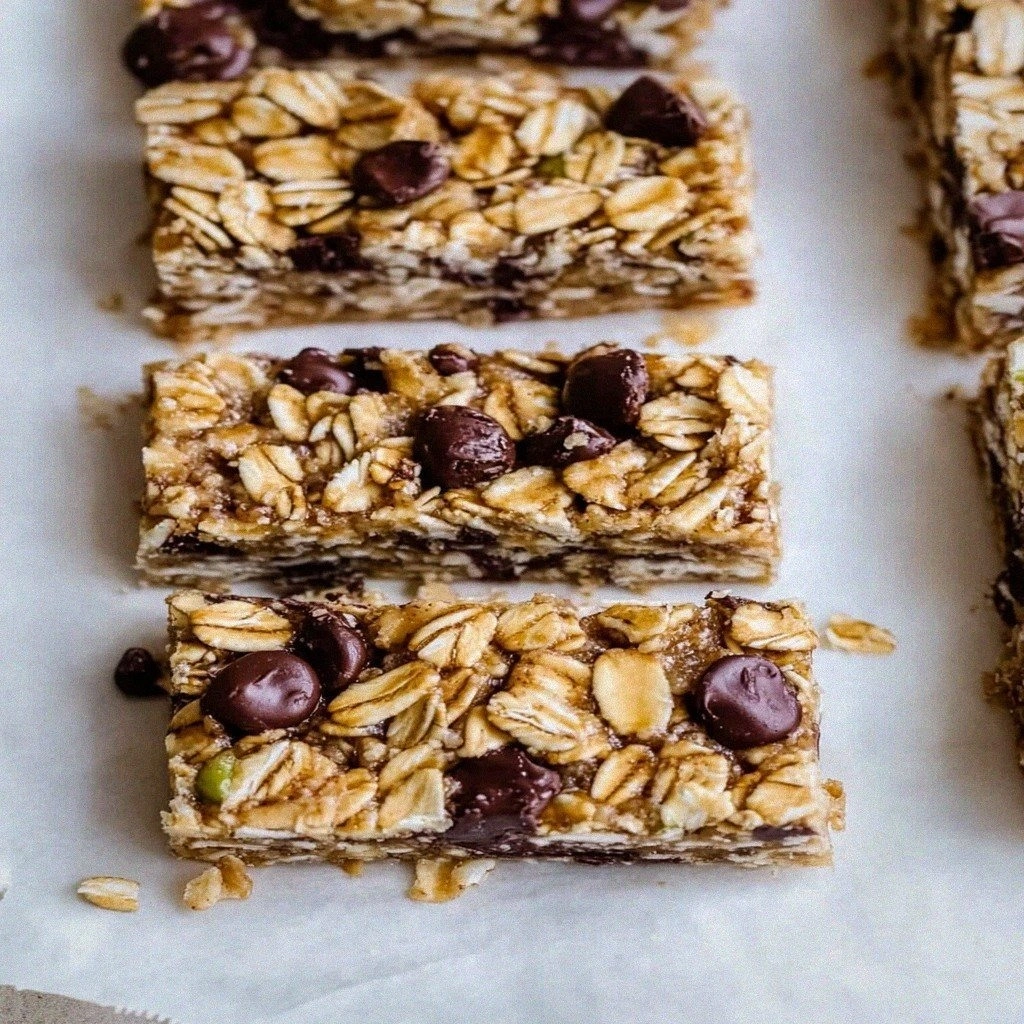 Save
Save
It was a crisp Saturday morning in early October, the kind of day when the kitchen smells like a promise of comfort and the world outside feels like a soft blanket of mist. I was rummaging through my pantry, pulling out a dusty bag of old‑fashioned oats that had been waiting for its moment to shine, when the idea struck like a flash of golden sunlight through the kitchen window. The moment I lifted the lid of the jar, a cloud of warm, nutty aroma rose up, instantly reminding me of my grandmother’s kitchen where granola bars were the secret weapon for school lunches and hiking trips alike. I could almost hear the rustle of the parchment paper as she would cut the bars into perfect squares, each bite a harmonious blend of sweet, salty, and chewy textures that made every snack feel like a celebration.
I decided then and there to turn that nostalgic memory into a recipe that anyone could master, no matter how busy or inexperienced they might be. The beauty of homemade granola bars lies in their simplicity: a handful of pantry staples, a quick stir, a short bake, and you have a portable, nutritious treat that can power you through a marathon meeting or a mountain hike. What makes this version truly irresistible is the balance between the caramelized honey, the creamy nut butter, and the crunchy medley of nuts, seeds, and dried fruit—all bound together by the wholesome embrace of oats. Imagine the first bite: the snap of toasted nuts, the subtle chew of raisins, and the lingering sweetness that feels like a hug from the inside.
But wait—there’s a secret trick that takes these bars from good to unforgettable, and I’m saving it for step four of the method. Trust me, you’ll want to know why a splash of maple syrup at the very end can transform the texture from merely firm to perfectly chewy, creating that coveted “just‑right” bite that makes you reach for another piece without feeling guilty. And if you think you’ve seen every granola bar variation out there, think again; I’m about to reveal a handful of flavor twists that will have your friends begging for the recipe.
Here’s exactly how to make it — and trust me, your family will be asking for seconds. Grab a bowl, preheat the oven, and let’s embark on this delicious adventure together. By the end of this article, you’ll not only have a batch of bars that taste like a childhood memory but also a toolbox of tips and tricks to customize them for any season, diet, or craving you might have.
🌟 Why This Recipe Works
- Flavor Depth: The combination of honey (or maple syrup) and nut butter creates a layered sweetness that deepens as the bars bake, giving you caramel notes without any artificial additives. This natural sweetness pairs perfectly with the earthy tones of oats and the toasted richness of nuts, making each bite feel indulgent yet wholesome.
- Texture Harmony: Old‑fashioned oats provide a chewy backbone, while toasted nuts and seeds add a satisfying crunch. The dried fruits introduce pockets of soft chewiness, creating a delightful contrast that keeps your palate engaged from the first bite to the last.
- Ease of Preparation: With only one bowl and a single baking sheet, the process is streamlined for even the most time‑pressed home cook. No fancy equipment, no complicated steps—just mix, press, bake, and cool.
- Time Efficiency: From start to finish, you’re looking at roughly 45 minutes, including a short cooling period. This makes the bars an ideal make‑ahead snack for busy weekdays or weekend adventures.
- Versatility: The base recipe is a blank canvas that welcomes endless variations—think chocolate chips, coconut flakes, or even a hint of espresso. You can tailor it to suit vegan, gluten‑free, or low‑sugar diets with simple swaps.
- Nutrition Boost: Each ingredient contributes something valuable: oats bring fiber, nut butter adds protein and healthy fats, and nuts and seeds provide essential minerals and antioxidants. Together they form a balanced snack that fuels both body and mind.
- Ingredient Quality: By using whole, minimally processed components, you avoid the hidden sugars and preservatives often found in store‑bought bars. This means you control what goes into your body, and you can taste the difference immediately.
- Crowd‑Pleasing Factor: Whether you’re feeding picky kids, feeding a group of friends at a brunch, or packing a snack for a marathon training session, these granola bars win hearts with their familiar yet elevated flavor profile.
🥗 Ingredients Breakdown
The Foundation: Oats & Sweeteners
Old‑fashioned oats are the heart of this bar, providing the chewy texture that holds everything together. Their rolled shape creates little pockets that trap the honey and nut butter, ensuring each bite is moist and flavorful. If you’re looking for a gluten‑free version, simply swap in certified gluten‑free rolled oats; the result is just as satisfying. Choose oats that are as fresh as possible—older oats can lose some of their natural sweetness and become a bit too dry.
Honey or maple syrup serves a dual purpose: it sweetens the bar and acts as a natural binder, helping the mixture set firmly once cooled. I prefer a blend of both for a complex flavor—honey adds a floral note while maple brings a deep, caramel‑like richness. For vegans or those with a honey allergy, pure maple syrup works beautifully on its own.
The Creamy Glue: Nut Butter
Nut butter—whether almond, peanut, or even cashew—introduces a creamy richness that balances the crunch of the nuts and seeds. It also boosts the protein content, making these bars a more complete snack. If you’re watching your sodium intake, opt for a no‑salt-added variety, and if you’re allergic to peanuts, almond butter is a fantastic alternative that adds a subtle, buttery flavor.
A quick tip: warming the nut butter slightly (about 30 seconds in the microwave) makes it easier to blend with the honey, creating a smoother, more cohesive mixture. This is the moment where the magic truly begins, as the glossy mixture starts to coat every oat and nut like a silky veil.
The Crunch & Crunchier: Nuts and Seeds
Nuts and seeds are the textural heroes of this recipe. Almonds, walnuts, and sunflower seeds each bring a distinct crunch and a burst of healthy fats, vitamins, and minerals. Toast them lightly in a dry skillet for 3‑5 minutes, stirring constantly, to unlock their aromatic oils and enhance their flavor. If you love a bit of spice, toss them with a pinch of sea salt and smoked paprika before toasting.
When selecting nuts, look for raw, unsalted varieties to control the overall sodium level. For a nut‑free version, pumpkin seeds or hemp seeds can step in nicely, still providing that satisfying crunch and a boost of magnesium.
The Sweet Chew: Dried Fruits
Raisins and cranberries bring a natural sweetness and a chewy texture that contrasts beautifully with the toasted nuts. They also add a pop of color, making the bars look as appetizing as they taste. If you prefer a tropical twist, swap in dried pineapple or mango pieces; just be mindful of their higher sugar content.
A handy tip: if your dried fruit is a bit too dry, give it a quick soak in warm water or orange juice for a minute, then drain well. This rehydrates them just enough to stay moist without making the entire bar soggy.
With your ingredients prepped and ready, let's get cooking. Here's where the fun really begins...
🍳 Step-by-Step Instructions
🔐 Expert Tips for Perfect Results
The Taste Test Trick
Before you bake, press a small spoonful of the mixture between your thumb and forefinger. If it sticks together without crumbling, the binding ratio is perfect. If it feels dry, add a splash more honey; if it feels too sticky, sprinkle a few extra oats. This quick test saves you from a batch of bars that fall apart later.
Why Resting Time Matters More Than You Think
Allowing the bars to rest for at least an hour after cooling lets the sugars fully set, creating that coveted snap. I once cut the bars immediately after they cooled, only to find them soft and crumbly—lesson learned! Patience truly pays off here.
The Seasoning Secret Pros Won’t Tell You
A pinch of flaky sea salt on top right before baking amplifies the sweetness and adds a sophisticated flavor contrast. You can also experiment with a dash of cinnamon or a pinch of espresso powder for an unexpected depth. These tiny tweaks elevate the bars from everyday snack to gourmet treat.
The Moisture Balance Hack
If you live in a dry climate, consider adding a tablespoon of unsweetened applesauce to the wet mixture. This extra moisture helps keep the bars from drying out during baking, ensuring a tender interior. I discovered this during a winter bake‑off, and the bars turned out perfectly moist.
Storage Smarts
Once the bars are fully cooled, store them in an airtight container with a paper towel at the bottom to absorb any excess moisture. This keeps them fresh for up to a week. For longer storage, wrap individual bars in parchment and freeze—just thaw for a few minutes before enjoying.
🌈 Delicious Variations to Try
One of my favorite things about this recipe is how versatile it is. Here are some twists I've tried and loved:
Chocolate‑Chunk Delight
Fold in ½ cup of dark chocolate chunks after mixing the wet and dry ingredients. The chocolate melts slightly during baking, creating pockets of gooey richness that contrast beautifully with the crunchy nuts.
Tropical Sunrise
Swap the dried cranberries for dried pineapple and add ¼ cup of shredded coconut. The result is a bright, sunny flavor profile that transports you to a beachside breakfast.
Spiced Autumn Harvest
Add 1 teaspoon of pumpkin spice and a handful of pumpkin seeds. This variation is perfect for fall, offering warm, comforting notes that pair wonderfully with a cup of chai.
Nut‑Free Power Boost
Replace the nuts with an extra cup of mixed seeds—sunflower, pumpkin, and hemp. Add a scoop of plant‑based protein powder for an extra protein punch without any allergens.
Citrus Zest Surprise
Stir in the zest of one orange and a tablespoon of dried apricots. The citrus zest adds a bright, fragrant lift that cuts through the sweetness, making the bars feel lighter.
Savory Herb Infusion
For a bold twist, omit the sweeteners and instead use ¼ cup of olive oil, a tablespoon of rosemary, and a pinch of sea salt. These savory bars pair perfectly with cheese plates or as a crunchy topping for salads.
📦 Storage & Reheating Tips
Refrigerator Storage
Place the bars in an airtight container with a paper towel at the bottom to absorb moisture. They will stay fresh for up to 7 days, retaining their chewy interior and crisp edges. If you notice any condensation, simply replace the paper towel.
Freezing Instructions
Wrap each bar individually in parchment paper, then place them in a zip‑top freezer bag. They can be frozen for up to 3 months. When you’re ready to enjoy one, let it sit at room temperature for 10 minutes or pop it in the microwave for 15 seconds.
Reheating Methods
If you prefer a warm, melty bite, reheat a bar in the microwave for 10‑15 seconds, or place it in a preheated oven at 300°F for 5 minutes. The trick to reheating without drying it out? A splash of water on the parchment while it warms, creating a gentle steam that revives the softness.
❓ Frequently Asked Questions
Can I make these bars gluten‑free?
How can I make these bars vegan?
Can I add chocolate chips without them melting?
What if I don’t have a parchment-lined pan?
How long can I store the bars at room temperature?
Can I use brown sugar instead of honey?
What’s the best way to cut clean squares?
Can I add protein powder?
Similar Recipes
 Breakfast
Savory Carrot Zucchini Pancakes Recipe
Delicious Savory Carrot Zucchini Pancakes Recipe
 Breakfast
Baked Cinnamon French Toast Muffins: A Delicious Breakfast Treat
Delicious baked cinnamon French toast muffins perfect for a quick breakfast or brunch. Easy to make,…
 Breakfast
Apple Cinnamon Protein Pancake Wraps
Delicious Apple Cinnamon Protein Pancake Wraps
 Breakfast
cranberry orange scones with white chocolate chips for holiday breakfasts
Learn how to make delicious cranberry orange scones with white chocolate chips for holiday breakfasts. Easy…
 Breakfast
Irresistible Italian Vegetable Frittata with Feta Recipe
Learn how to make delicious Irresistible Italian Vegetable Frittata with Feta Recipe. Easy recipe with step-by-step…
 Breakfast
warm breakfasts with sweet potatoes spinach and a touch of garlic
Cozy up to a warm breakfast of roasted sweet potatoes, sautéed spinach & a kiss of…
 Breakfast
Golden Harvest Fluffy Pumpkin Waffles
Delicious Golden Harvest Fluffy Pumpkin Waffles
 Breakfast
Sweet & Savory Fig Jam Muffins
Delicious Sweet & Savory Fig Jam Muffins

Lucy
I cook these recipes at home before they ever land here — simple ingredients, clear steps.
Other Reader Favorites
Breakfast
warm breakfasts with sweet potatoes spinach and a touch of garlic
Cozy up to a warm breakfast of roasted sweet potatoes, sautéed spinach & a kiss of…
 Desserts
Chocolate Covered Strawberry Valentines: 5 Ways to Delight
Learn how to make delicious Chocolate Covered Strawberry Valentines: 5 Ways to Delight. Easy recipe with…
 Appetizers
Corny Bliss Fritters with Crispy Bacon: The Ultimate Recipe Guide
Delicious Corny Bliss Fritters with Crispy Bacon: The Ultimate Recipe Guide
 Breakfast
Golden Waffle Tacos Recipe
Delicious Golden Waffle Tacos Recipe