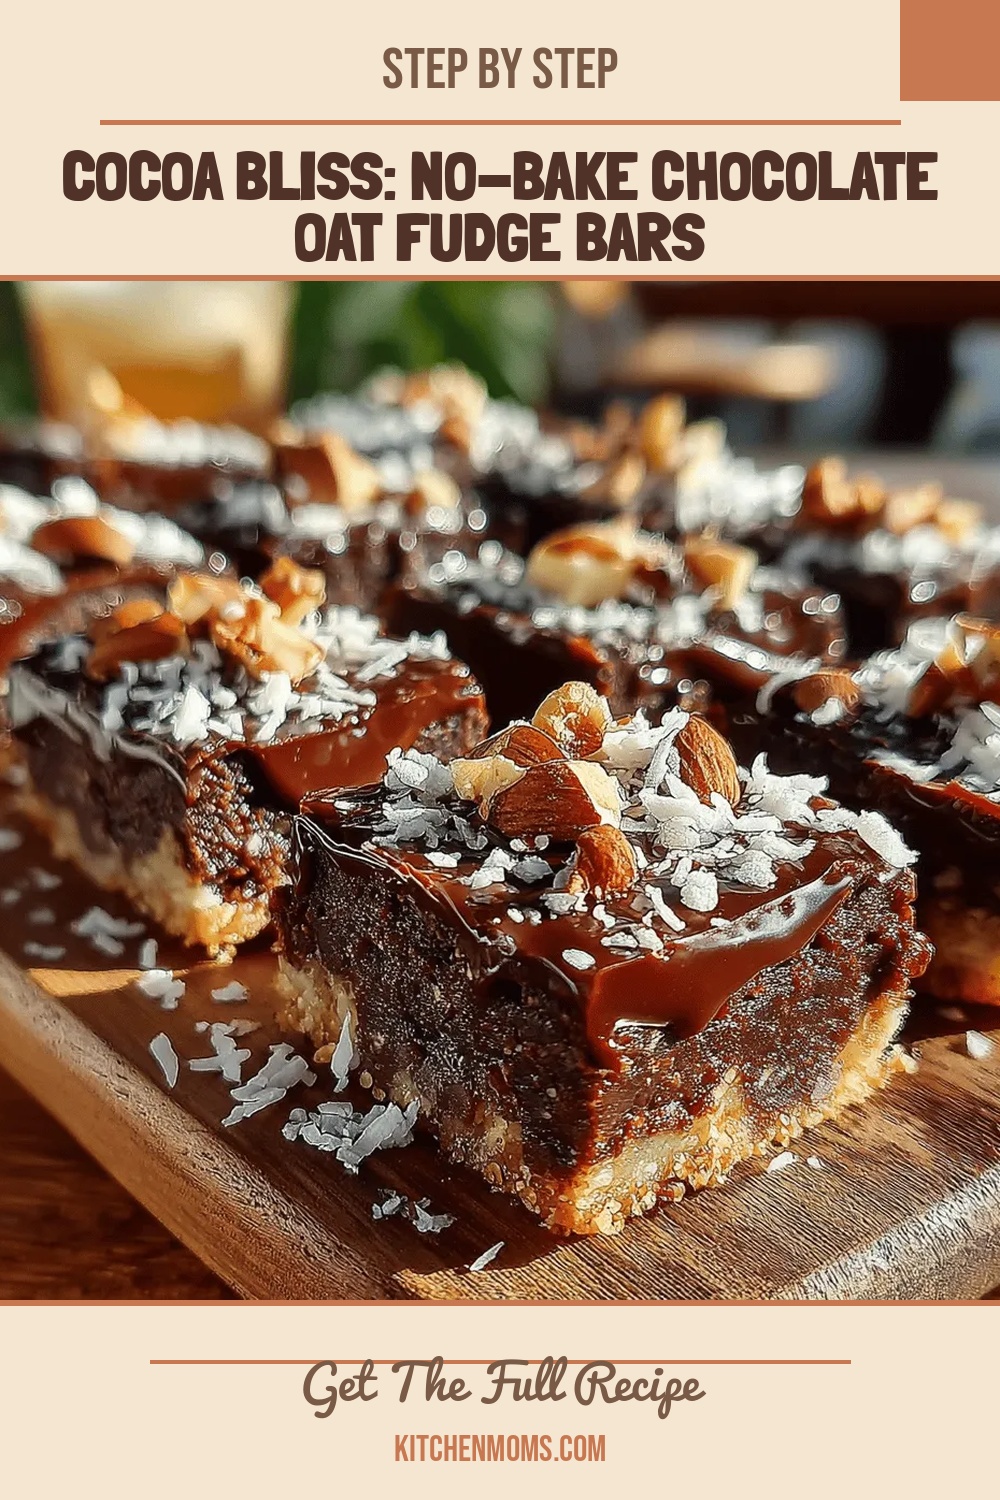
Cocoa Bliss: No-Bake Chocolate Oat Fudge Bars
 Save
Save
Imagine a dessert that feels like a hug in every bite—rich chocolate, chewy oats, and a buttery melt‑in‑your‑mouth texture, all without ever touching the oven. That’s the magic of Cocoa Bliss: No‑Bake Chocolate Oat Fudge Bars, a treat that delivers pure indulgence while staying wonderfully simple.
What makes this recipe stand out is the balance between deep cocoa flavor and the wholesome chew of rolled oats, bound together with a silky caramel‑like drizzle of honey and butter. The result is a bar that’s both decadently chocolatey and surprisingly hearty.
This dessert is perfect for anyone who craves chocolate but doesn’t have the time or equipment for a baked cake—kids after school, busy parents, or anyone looking for a quick sweet fix. Serve it at birthday parties, potlucks, or as a midnight snack.
The process is straightforward: melt the chocolate‑butter mixture, stir in oats and sweeteners, spread the batter into a pan, chill until set, and slice into perfect bars. No mixers, no ovens, just a few pantry staples and a little patience.
Why You'll Love This Recipe
Zero Oven Required: Skipping the oven means less heat in the kitchen, making it ideal for summer days or tiny apartments where you want to keep things cool.
Quick Prep, Long‑Lasting Sweetness: In under 20 minutes you have a dessert that stays fresh for a week, giving you a ready‑made treat whenever the craving hits.
Customizable Texture: The oats provide a satisfying chew, but you can adjust the amount for a softer or crunchier bite, tailoring it to your personal preference.
Kid‑Friendly & Portable: Cut into bite‑size bars, wrap them individually, and you have a snack that’s easy for little hands and perfect for lunchboxes.
Tips & Tricks
Perfecting the Recipe
Use high‑quality chocolate. A cocoa content of 60‑70 % gives depth without excessive bitterness, ensuring the bars are rich but not overly intense.
Do not over‑mix. Once the chocolate is incorporated, stir just until combined; over‑mixing can break down the oat texture and make the bars dense.
Cool the chocolate slightly before adding oats. If the chocolate is too hot, it can melt the honey and syrup, resulting in a runnier base.
Flavor Enhancements
Add a dash of espresso powder for an instant mocha lift, or swirl in a spoonful of peanut butter for a nutty twist. For a festive touch, sprinkle a pinch of cinnamon or orange zest into the oat mixture before folding in the chocolate.
Common Mistakes to Avoid
Skipping the parchment overhang often leads to broken bars when lifting the set slab. Also, avoid using low‑fat butter; the fat content is crucial for a glossy, firm texture. Finally, don’t rush the chilling step—insufficient cooling results in crumbly, not firm, bars.
Pro Tips
Warm your knife. Run the blade under hot water, dry, and slice; this prevents the chocolate from cracking and yields clean edges.
Toast the oats. Lightly toast rolled oats in a dry skillet for 3‑4 minutes before mixing; this adds a deeper, nutty flavor.
Store with a parchment layer. Placing a sheet of parchment between stacked bars prevents them from sticking together.
Adjust sweetness. If you prefer a less sweet bar, reduce honey and maple syrup by one‑third; the chocolate still provides ample richness.
Variations
Ingredient Swaps
Replace semi‑sweet chocolate chips with dark chocolate for a richer, more intense flavor, or swap for white chocolate if you love a sweeter, buttery profile. Oats can be exchanged for puffed quinoa or shredded coconut for a lighter texture. For nut‑free versions, omit almonds and use sunflower seeds instead.
Dietary Adjustments
Use dairy‑free butter (such as coconut oil) and a vegan chocolate chip blend to make the bars completely plant‑based. Substitute honey with agave nectar or maple syrup alone for a strict vegan version. For a low‑sugar approach, replace both sweeteners with a sugar‑free maple‑style syrup and add a few drops of liquid stevia.
Serving Suggestions
Pair the bars with a dollop of Greek yogurt or a splash of almond milk for a quick dessert parfait. Crumble them over ice cream for added crunch, or serve alongside a robust cup of coffee for an afternoon pick‑me‑up. They also travel well in lunchboxes for a wholesome sweet snack.
Storage Info
Leftover Storage
Allow the bars to cool completely, then wrap each piece in parchment and place them in an airtight container. Store in the refrigerator for up to 5 days. For longer keeping, freeze the individually wrapped bars in a zip‑top freezer bag; they retain flavor and texture for up to 3 months.
Reheating Instructions
To enjoy a warm bar, remove it from the freezer, let it sit at room temperature for 10 minutes, then microwave on medium power for 15‑20 seconds. The chocolate will soften without melting, giving you a gooey, melt‑in‑your‑mouth experience. Avoid microwaving longer than 30 seconds to prevent a rubbery texture.
Frequently Asked Questions
Can I make these bars ahead of time for a party?
What if I don’t have rolled oats—can I substitute something else?
How long will the bars stay fresh at room temperature?
This no‑bake chocolate oat fudge bar delivers a luxurious chocolate experience with minimal effort, making it an ideal go‑to dessert for any occasion. By following the detailed steps, using quality ingredients, and applying the handy tips, you’ll achieve bars that are glossy, chewy, and perfectly set. Feel free to experiment with nuts, spices, or dairy‑free swaps—your creativity is the only limit. Enjoy the blissful bite of Cocoa Bliss!
Cocoa Bliss: No-Bake Chocolate Oat Fudge Bars
Delicious Cocoa Bliss: No-Bake Chocolate Oat Fudge Bars
Ingredients
Base & Chocolate
- 1 ½ cups (340 g) semi‑sweet chocolate chips
- ¼ cup (60 ml) unsalted butter, cut into cubes
Oats & Sweeteners
- 1 ½ cups (150 g) rolled oats
- ⅓ cup (80 ml) honey
- ⅓ cup (80 ml) pure maple syrup
Flavor & Finishing Touches
- ½ teaspoon pure vanilla extract
- ¼ teaspoon sea salt, plus a pinch for sprinkling
- ¼ cup (30 g) toasted chopped almonds or pecans (optional)
- ¼ cup (30 g) dried cranberries or cherries (optional)
Instructions
Setting the Bars
- Spread Evenly. Transfer the batter to the prepared pan, spreading it with a spatula to create an even ½‑inch thick layer. The surface should be smooth; a wet spatula helps achieve a flawless finish.
- Add Optional Toppings. Sprinkle the toasted nuts, dried fruit, and a light pinch of sea salt over the top. Press them gently into the surface so they adhere during chilling.
- Chill Rapidly. Place the pan in the refrigerator for at least 1 hour, or in the freezer for 30 minutes if you’re short on time. The bars should become firm enough that a clean slice can be cut without crumbling.
- Slice the Bars. Using the parchment overhang, lift the set slab onto a cutting board. With a sharp knife warmed under hot water, cut into 12 equal rectangles. Warm the blade between cuts for clean edges.
- Serve or Store. Arrange the bars on a platter, serve immediately, or wrap each bar in parchment and store as directed below. The bars stay glossy and firm when kept cool.
Similar Recipes
 Desserts
Cranberry Walnut Bliss Bars: The Ultimate Guide to a Delicious Snack
Delicious Cranberry Walnut Bliss Bars: The Ultimate Guide to a Delicious Snack
 Desserts
Amazing 10-Minute Gingerbread Energy Balls Secret
Learn how to make delicious Amazing 10-Minute Gingerbread Energy Balls Secret. Easy recipe with step-by-step instructions.
 Desserts
Frosty Strawberry Banana Bliss Cups Recipe
Delicious Frosty Strawberry Banana Bliss Cups Recipe
 Desserts
Tropical Bliss Frozen Mango Lime Yogurt Slices
Delicious Tropical Bliss Frozen Mango Lime Yogurt Slices
 Desserts
Pumpkin Pie Sticky Bars
Discover the perfect pumpkin pie sticky bars – moist, spiced, and topped with a caramel glaze.…
 Desserts
The Best Oatmeal Raisin Cookies: Chewy & Irresistible Treats
Learn how to make delicious The Best Oatmeal Raisin Cookies: Chewy & Irresistible Treats. Easy recipe…
 Desserts
Frozen Fruit Fiesta Cups: A Refreshing Treat
Delicious Frozen Fruit Fiesta Cups: A Refreshing Treat
 Desserts
Silky Coconut Mango Chia Parfait: A Wholesome Delight
Delicious Silky Coconut Mango Chia Parfait: A Wholesome Delight

Lucy
I cook these recipes at home before they ever land here — simple ingredients, clear steps.